Hello, World!
| Author: | JChimene |
|---|
Contents
The purpose of this tutorial is to provide a starting point for users who are new to Dojo. Whilst every effort is made to introduce as much as possible about Dojo, it is impossible to include more of the detailed information since to do so would be counterproductive and confusing to new users. For more information on the concepts introduced here, please see the links to other resources at the end of this document (Finding More Resources).
Requirements
Obviously, you need Dojo first! You can get the latest stable build from dojotoolkit.org. Next you need a web server. Whether it’s hosted offsite or onsite, on Linux or Windows or Mac ... matters naught. The Dojo JavaScript library is simply pulled from your web server to the browser as needed. However, the AJAX examples in this document require a server-side scripting language like PHP or ASP.
The Dojo and Dijit code, which runs on the client browser, is certified to run on IE, Firefox, Opera and Safari.
Setting Up Dojo
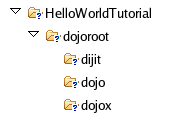
First, you should create a directory on the web server. We’ll call ours HelloWorldTutorial. Then create a directory called dojoroot underneath it. Finally, use your favorite unzipping tool to unzip Dojo into /HelloWorldTutorial/dojoroot. It’ll look like this when you’re done:
Getting Started
Once we have setup the directory and file structure for the tutorial, we will need to setup the JavaScript component of our HTML page. Have a look at the code below:
<html>
<head>
  <title>Dojo: Hello World!</title>

  <!-- SECTION 1 -->
  <style type="text/css">
      @import "dojoroot/dijit/themes/tundra/tundra.css";
      @import "dojoroot/dojo/resources/dojo.css"
  </style>
  <script type="text/javascript" src="dojoroot/dojo/dojo.js"
    data-dojo-config="parseOnLoad: true"></script>
</head>

<body class="tundra">
</body>
</html>
As it can be seen above, the page is a just a standard HTML skeleton with three things:
- A couple of CSS style sheets. The one marked Tundra is the theme we will use from Dijit for this example. There are other themes available.
Creating a Button Widget
Ok, now for the exciting part! In this example we’re going to create a Button widget with the text ‘Hello World!’. In the case of the Button widget, three visual states (mouseOut, mouseOver, and mouseDown) are available which means that we are able to enhance the user’s experience somewhat.
The first step in creating the widget is telling Dojo to load the appropriate modules. In the header, add another section (hereafter referred to as section 2) below section 1 as follows:
<!-- SECTION 2 -->
<script type="text/javascript">
   // Load Dojo's code relating to the Button widget
   dojo.require("dijit.form.Button");
</script>
The dojo.require line instructs Dojo to load the Button widget. If you were to omit this line, the markup code for the button would not be evaluated by Dojo upon loading, resulting in a plain HTML button instead of what you expect.
After making the changes, insert the following code into the body section of the HTML:
<button data-dojo-type="dijit.form.Button" id="helloButton">Hello World!</button>
The key attribute of this HTML element to notice is the data-dojo-type attribute. The data-dojo-type attribute is responsible for instructing Dojo on how to process the element when the page is loading. In this case we’ve used a button element for the button though we could have used an input element - Dojo will work with either as long as the data-dojo-type attribute is present. It is worth noting that if we did use an input element, we would have to specify the button’s text by using adding a caption attribute that contained the desired text.
Connecting an Event to the Widget
A button is all well and good, but what about getting it to do something when it’s clicked? We could just specify an onClick event handler for the button, but there’s another, more efficient way - the Dojo event system!
The easiest way to attach an event to a button is through a script tag. But not just any script tag ... this one has a type of dojo/method, like this:
<button data-dojo-type="dijit.form.Button" id="helloButton">
    Hello World!
    <script type="dojo/method" data-dojo-event="onClick">
       alert('You pressed the button');
    </script>
</button>
Pretty simple, eh? Putting the script inside the tag body makes a good deal of sense. And you can harness the full power of DOM Level 2 events inside the script. That means you can detect SHIFT and CTRL keys, get all sorts of event properties, and bubble events up through the HTML tree. If you’ve ever used Level 2 events, you know how IE and Firefox use different syntax. In Dojo, the same functions work in any supported browser. That’s powerful stuff!
Reading Data from the Server
Having an alert pop up when we press the button is great, but what if we want to retrieve some data from the server? Again, Dojo comes to the rescue with an easy method of accomplishing this - dojo.xhrGet. For easy reference, the code for this section is available as HelloWorld-txt.html and response.txt in the attachments section.
To get started, we first need a callback function to handle the data to be returned from the server. Insert the following code into the header:
<script type="text/javascript">
     function helloCallback(data, ioArgs){
        alert(data);
     }
     function helloError(data, ioArgs){
        alert('Error when retrieving data from the server!');
     }
</script>
The two arguments to the functions (data, and ioArgs) are important - don’t leave any of them out! The first argument (data) contains the data sent back from the server, whilst the second argument contains a Dojo I/O Bind object. Only the first concerns us right now.
The next step is to link the click of the button to the server request. To do this, modify the following code:
<script type="dojo/method" data-dojo-event="onClick">
  alert('You pressed the button');
</script>
To this:
<script type="dojo/method" data-dojo-event="onClick">
 dojo.xhrGet({
      url: 'response.txt',
      load: helloCallback,
      error: helloError
 });
</script>
The above code basically tells Dojo to query the URL specified by url and to use the function specified by handler to process the response from the server.
Finally, we need to create another file in the same directory as HelloWorld-txt.html called response.txt. In this file, place the text ‘Welcome to the Dojo Hello World Tutorial’.
Now, when the button is clicked, a JavaScript alert should display the text from the response.txt file. Dojo-Easy!
Next, we’ll look at doing something meaningful with that server request.
Sending Data to the Server Using GET
It’s all well and good retrieving static data from the server, but it is hardly a widely used situation in real life. So, instead of simply requesting data from the server we also will send it some information for it to process. In this section, we’ll use the GET method whilst in the next section we’ll use the POST method. For easy reference, the code for this section is available as HelloWorld-get.html in the attachments section. For server side code create file HelloWorldResponseGET.<type> where type is ASP (‘.asp’), PHP (‘.php’), ColdFusion (‘.cfm’), or Java (‘.jsp’).
Firstly, in the markup section of the HelloWorld html file (i.e. the body section), we need to add another element - an input element. So, change the code in this section from:
<button data-dojo-type="Button" widgetId="helloButton">
  <script type="dojo/method" data-dojo-event="onClick">
  dojo.xhrGet({
      url: 'response.txt',
      load: helloCallback,
      error: helloError
  });
  </script>
</button>
to:
<button data-dojo-type="dijit.form.Button" id="helloButton">
   Hello World!
   <script type="dojo/method" data-dojo-event="onClick">
   dojo.xhrGet({
      url: 'HelloWorldResponseGET.php',
      load: helloCallback,
      error: helloError,
      content: {name: dojo.byId('name').value }
   });
   </script>
</button>
Please enter your name: <input type="text" id="name" />
Before we go any further - it is important to mention that the url property in the dojo.xhrGet function call must be set to the file that is appropriate to your environment. If you are using an ASP server then the value must read ‘HelloWorldResponseGET.asp’ instead of ‘HelloWorldResponseGET.php’ Likewise, if you are using a ColdFusion server then the value must read ‘HelloWorldResponseGET.cfm’ instead of ‘HelloWorldResponseGET.php’. Finally, if you are using a Java server (JSP) then the value must read ‘HelloWorldResponseGET.jsp’ instead of ‘HelloWorldResponseGET.php’, or if you are using a Perl server then the value must read ‘HelloWorldResponseGET.pl’ instead of ‘HelloWorldResponseGET.php’. The code for these files is in the sections below, and is also available as attachments to this tutorial.
In the code above, you will notice that there is a new property that has been passed to the dojo.xhrGet function. This property - content - allows the programmer to send arbitrary values to the server as parameters. In this case, since we are using the default method of dojo.io.bind which is GET, the server side script will have the value of the textbox available to it as the GET parameter ‘name’. It is worth mentioning that if the script expected the parameter under a different name (such as ‘myName’), we would simply change the content property to be (note the change of ‘name’ to ‘myName’ on the left of the assignment operator ‘:’):</p>
content: {myName: dojo.byId('name').value }
Since we’ve not used it before, it is also worth noting the call dojo.byId(‘name’).value. Quite simply, this call is a shortcut for the standard document.getElementById(..) function.
Finally, if you enter your name into the text box and you click the ‘Hello World’ button, an alert box should appear with the message ‘Hello <name>, welcome to the world of Dojo!’ where <name> is the name you entered into the text box.
Here are the server side scripts.
Using a PHP Server
<?php
/*
* HelloWorldResponseGET.php
* --------
*
* Print the name that is passed in the
* 'name' $_GET parameter in a sentence
*/

header('Content-type: text/plain');
print "Hello {$_GET['name']}, welcome to the world of Dojo!\n";
?>
Using an ASP Server
<%
'
' HelloWorldResponseGET.asp
' --------
'
' Print the name that is passed in the
' 'name' GET parameter in a sentence
'

response.ContentType="text/plain"
response.write("Hello " & request.querystring("name") & ", welcome to the world of Dojo!\n")
%>
Using a ColdFusion Server
<!---
/*
* HelloWorldResponseGET.cfm
* --------
*
* Print the name that is passed in the
* 'name' GET parameter in a sentence
*/
--->
<cfsetting showDebugOutput="No">
Hello, #url.name#, welcome to the world of Dojo!
</cfsetting>
Using a Java Server (JSP)
<%
/*
' HelloWorldResponseGET.jsp
' --------
'
' Print the name that is passed in the
' 'name' GET parameter in a sentence
*/

response.setContentType("text/plain");
%>
Hello <%= request.getParameter("name") %> , welcome to the world of Dojo!
Using a Perl Server
#!/usr/bin/perl
#
#  ' HelloWorldResponseGET.pl
#  ' --------
#  '
#  ' Print the name that is passed in the
#  ' 'name' GET parameter in a sentence
#
use strict;
use CGI;
my $cgi = CGI::new();
print $cgi->header(-type => "text/html; charset=utf-8");
print "Hello " . $cgi->param('name') . ", welcome to the world of Dojo!\n";
Sending Data to the Server Using POST
Using GET data is all well and good, but sometimes you want to use Dojo to improve the user’s experience when using a traditional HTML form. As usual, Dojo has a very nice way of making this easier. For easy reference, the code for this section is available as HelloWorld-post.html in the attachments section. Additionally, as with the last section, you will need to change the ‘url’ property to point to the file that is appropriate to your environment.
First, we need to change the markup in the body of HelloWorld html from:
Please enter your name: <input type="text" id="name" />
to:
<form id="myForm" method="POST">
  Please enter your name: <input type="text" name="name" />
</form>
Next we need to change the dojo/method:
<script type="dojo/method" data-dojo-event="onClick">
      dojo.xhrGet({
         url: 'HelloWorldResponseGET.php',
         load: helloCallback,
         error: helloError,
         content: {name: dojo.byId('name').value }
      });
</script>
to:
<script type="dojo/method" data-dojo-event="onClick">
 // Don't forget to replace the value for 'url' with
 // the value of appropriate file for your server
 // (i.e. 'HelloWorldResponsePOST.asp') for an ASP server
  dojo.xhrPost({
      url: 'HelloWorldResponsePOST.php',
      load: helloCallback,
      error: helloError,
      form: 'myForm'
 });
</script>
As can be seen from the code above, we’ve changed dojo.xhrGet to dojo.xhrPost. We’ve removed the ‘content’ property and replaced it with a new property ‘form’. This basically informs the dojo.xhrPost function that it needs to use the form ‘myForm’ as the source for the data in the call.
As with the last section, entering your name and clicking ‘Hello World!’ should yield a message such as ‘Hello <name>, welcome to the world of Dojo!’ where <name> is the name you entered into the text box.
Using a PHP Server
<?php
/*
* HelloWorldResponsePOST.php
* --------
*
* Print the name that is passed in the
* 'name' $_POST parameter in a sentence
*/

header('Content-type: text/plain');
print "Hello {$_POST['name']}, welcome to the world of Dojo!\n";
?>
Using an ASP Server
<%
'
' HelloWorldResponsePOST.asp
' --------
'
' Print the name that is passed in the
' 'name' POST parameter in a sentence
'

response.ContentType="text/plain"
response.write("Hello " & request.form("name") & ", welcome to the world of Dojo!\n")
%>
Using a ColdFusion Server
<!---
/*
* HelloWorldResponsePOST.cfm
* --------
*
* Print the name that is passed in the
* 'name' POST parameter in a sentence
*/
--->
<cfsetting showDebugOutput="No">
Hello, #form.name#, welcome to the world of Dojo!
</cfsetting>
Using a Java Server (JSP)
<%
/*
' HelloWorldResponsePOST.jsp
' --------
'
' Print the name that is passed in the
' 'name' POST parameter in a sentence
*/

response.setContentType("text/plain");
%>
Hello <%= request.getParameter("name") %> , welcome to the world of Dojo!
Using a Perl Server
#!/usr/bin/perl
#
#  ' HelloWorldResponsePOST.pl
#  ' --------
#  '
#  ' Print the name that is passed in the
#  ' 'name' POST parameter in a sentence
#
use strict;
use CGI;
my $cgi = CGI::new();
print $cgi->header(-type => "text/html; charset=utf-8");
print "Hello " . $cgi->param('name') . ", welcome to the world of Dojo!\n";
Finding more resources
I hope you’ve enjoyed this tutorial and found it informative. No doubt though, you will need more information on Dojo and how it and it’s widgets work. Below is a list of links that will point you in the right direction.
- The documentation page for Dojo with links to all documentation.