This tutorial is for Dojo 1.7 and may be out of date.
Up to date tutorials are available.
Connecting a Store to a Tree
The Dojo Tree component is a powerful tool for visual presentation of hierarchical data. In this tutorial we will look at how to connect the tree to a store for quick and efficient data drill-down into nested data.
Introduction
The Dojo Tree component provides a comprehensive, familiar, intuitive drill-down presentation of hierarchical data.
The first example uses a static tree with the data sourced from a single JSON file. This can be used to provide navigation through data. The second example includes powerful features like lazy loading, drag and drop, and dynamic tree manipulation.
Tree with a Static Store
A static store is well-suited for a tree with limited size that can't be changed dynamically. In this example, clicking on the tree nodes displays a related image.
The first step is to create the data. The store data is JSON-encoded, and can contain supporting information. In this case, the name is used to label each node of the tree. This tree has three items, each has name and an id.
{
	"label": "name",
	"name": "US Government",
	"id": "root",
	"items": [
		{
			"name": "Congress",
			"id": "congress"
		},
		{
			"name": "Executive",
			"id": "exec"
		},
		{
			"name": "Judicial",
			"id": "judicial"
		}
	]
}
Tree Code
The code reads the store data, applies a data model, and assigns it to the tree widget. The onLoad and onClick events are used to display the associated image.
      dojo.require("dojo.parser");
      dojo.require("dojo.data.ItemFileReadStore");
      dojo.require("dijit.Tree");
      dojo.require("dijit.tree.ForestStoreModel");

      // when dojo is loaded and ready
      dojo.ready(function(){

        // set up the store to get the tree data
        var governmentStore = new dojo.data.ItemFileReadStore({
          url: "data/static"
        });

        // set up the model, assigning governmentStore
        var governmentModel = new dijit.tree.ForestStoreModel({
          store: governmentStore,
          query: {"id": "*"},
          rootId: "root",
          rootLabel: "US Government",
          childrenAttrs: "items"
        });

        // set up the tree, assigning governmentModel
        var governmentTree = new dijit.Tree({
          model: governmentModel,
          onOpenClick: true,
          onLoad: function(){
            dojo.byId('image').src = '../resources/images/root.jpg';
          },
          onClick: function(item){
            dojo.byId('image').src = '../resources/images/'+item.id+'.jpg';
          }
        },"divTree");
      });
Note that we are using a ForestStoreModel, which allows multiple root nodes, so the tree or data can be accessed easily from different levels.
Trees and Object Stores
The Tree supports lazy loading of branches, making it highly scalable for large data sets. The Tree is a great widget to use when data has parent-child relationships.
Here we will learn how to use the new Dojo object store interface with the tree, to quickly build data-driven tree structures. In this example, we will consume a data source that provides information on the US government structure. We will display this information in a Tree in order to easily descend into sections of interest, while others remain collapsed. We are going to start from scratch, create a simple object store, and end up with a data-driven Tree with lazy loading, drag-n-drop, and real-time response to data changes.
Start with a Store
We will begin by creating our data source. This will be the store that drives the Tree. Here we will use the JsonRest store, which facilitates lazy loading of data. In this example we will present the hierarchy of the US government. Here is the basic instantiation of the JsonRest store for connecting to our server so that data can be retrieved RESTfully:
require(["dojo/store/JsonRest"], function(JsonRest) {
	usGov = new JsonRest({
		target:"data/"
	});
});
Add Basic Data Model Methods
We are going to use our store as the data model for the Tree. In order to do this, we also need to define the model logic that describes the hierarchy within our data. The Tree requires five model methods to render data as a tree:
getIdentity(object)- Already provided by the store, and doesn't usually need to be reimplemented.mayHaveChildren(object)- Indicates whether or not an object may have children (prior to actually loading the children). In this example, we will treat the presence of achildrenproperty as the indication that an item has children.getChildren(parent, onComplete, onError)- Called to retrieve the children. This may execute asynchronously and should call theonCompletecallback when finished. In this example, we will perform aget()to retrieve the full representation of the parent object to get the children. Once the parent is fully loaded, we return thechildrenarray from the parent.getRoot(onItem, onError)- Called to retrieve the root node. TheonItemcallback should be called with the root object. In this example, weget()the object with the id/URL of "root" for the root object.getLabel(object)- Returns the label for the object (this is the text that is displayed next to the node in the tree). In this example, the label is just thenameproperty of the object.
Now, let's look at how to implement the definition of our data structure's hierarchy. We can most easily do this by defining the methods in the JsonRest instantiation:
usGov = JsonRest({
	target:"data/",
	mayHaveChildren: function(object){
		// see if it has a children property
		return "children" in object;
	},
	getChildren: function(object, onComplete, onError){
		// retrieve the full copy of the object
		this.get(object.id).then(function(fullObject){
			// copy to the original object so it has the children array as well.
			object.children = fullObject.children;
			// now that we have the full object, we should have an array of children
			onComplete(fullObject.children);
		}, function(error){
			// an error occurred, log it, and indicate no children
			console.error(error);
			onComplete([]);
		});
	},
	getRoot: function(onItem, onError){
		// get the root object, we will do a get() and callback the result
		this.get("root").then(onItem, onError);
	},
	getLabel: function(object){
		// just get the name
		return object.name;
	}
});
Create Tree with our Store as Data Model
Now we can easily plug this store into our tree:
require(["dijit/Tree"], function(Tree) {
	tree = new Tree({ // create a tree
			model: usGov // give it the model
		}, "tree"); // target HTML element's id
	tree.startup();
});
When the Tree starts up, it will query our model/store for the root object. It will then ask the store for the label (via getLabel()) and get the children (via getChildren()). For each child, it will render the label and add an expander icon if the object might have children (via mayHaveChildren()). Our getChildren() and getRoot() functions delegate to get() calls, which trigger requests to the server (using the store's target, concatenated with the id passed to get(), as the URL for a GET request). The server responds to these requests with JSON to satisfy the model and Tree. Here is how it looks:
Lazy Loading
To take advantage of lazy loading, when loading an object with its children, our server provides each child of the object, but only includes enough data in the children to render it. The requested object is a "full" representation of the object. However, for each child only the "name" property (for the label), the "id" property (to identify the object), and a boolean for the "children" property (indicating if it may have children) are included. These child objects are effectively "partial" representations. This approach to lazy loading ensures that only one request is needed each time a node is expanded (rather than a request for each child node of the expanded node). Here is what our server returns for the "root" object (GET data/root):
{
	"name": "US Government",
	"id": "root",
	"children": [
		{
			"name": "Congress",
			"id": "congress",
			"children": true
		},
		{
			"name": "Executive",
			"id": "exec",
			"children": true
		},
		{
			"name": "Judicial",
			"id": "judicial"
		}
	]
}
Then, when we click to expand a node, the Tree will request the target object's children. This is translated to a request for the parent object's full representation. If we click on the Executive node, the store will use the target object's id ("exec") and request the full object, triggering the request GET data/exec. The server then responds with:
{
	"name": "Executive",
	"id": "exec",
	"children": [
		{
			"name": "President",
			"id": "pres"
		},
		{
			"name": "Vice President",
			"id": "vice-pres"
		},
		{
			"name": "Secretary of State",
			"id": "state"
		},
		{
			"name": "Cabinet",
			"id": "cabinet",
			"children": true
		}
	]
}
In this response, you can see that only the Cabinet object may have children.
User Modification of the Tree
The Tree widget has excellent support for drag-n-drop based modifications of the structural hierarchy of the tree. If we want to allow modifications to our data via drag-n-drop, we can implement the pasteItem() method and set the drag-n-drop controller for the tree. First, let's implement pasteItem(). This method is called when a drag-n-drop operation takes place. The pasteItem() method is called with several arguments:
child- The child object that is being pasted.oldParent- The parent object where the child was dragged from.newParent- The new parent of the child object, where the child was dragged to.bCopy- Indicates if the child should be copied (instead of moved).insertIndex- The index of where the child should be placed in the list of children for the new parent (if the store supports ordering of children).
The basic approach of implementing pasteItem() is straightforward. In our example, we simply want to remove the child object from the oldParent's children array and add the child object to the newParent's children array. We can do this by finding the index of the child in the oldParent's children array, use splice() to remove it, then use splice() to place it in the newParent's children array at the appropriate index. We then call put() for each of these parent objects to save the modification.
However, there are a couple of complications that we also need to consider. First, the parent objects may or may not be fully-downloaded objects. With our lazy-loading scheme, only full objects have a children array. Therefore, we will perform a get() on each of the parents to ensure we have the full object. Next, because there may be alternate copies of objects, we can't do a direct indexOf() call to find the child object in the children array, so we need to scan the array to find an object with a matching id.
With these considerations in mind, we can craft our pasteItem() implementation:
usGov = new JsonRest({
	pasteItem: function(child, oldParent, newParent, bCopy, insertIndex){
		// make this store available in all the inner functions
		var store = this;
		// get the full oldParent object
		store.get(oldParent.id).then(function(oldParent){
				// get the full newParent object
				return store.get(newParent.id)
			}).then(function(newParent){
				// get the oldParent's children and scan through it find the child object
				var oldChildren = oldParent.children;
				dojo.some(oldChildren, function(oldChild, i){
					// it matches if the ids match
					if(oldChild.id == child.id){
						// found the child, now remove it from the children array
						oldChildren.splice(i, 1);
						return true; // done, break out of the some() loop
					}
				});
				// do a put to save the oldParent with the modified childrens array
				store.put(oldParent);
				// now insert the child object into the new parent,
				// using the insertIndex if available
				newParent.children.splice(insertIndex || 0, 0, child);
				// save changes to the newParent
				store.put(newParent);
			}, function(error){
				// catch and report any errors
				alert("Error occurred (this demo is not hooked up to a real database, so this is expected): " + error);
			});
		});
	},
	...
Configure Drag-n-Drop for Tree
We then need to define the drag-n-drop controller for the Tree as well. We will use the standard dijit/tree/dndSource as the controller:
require(["dijit/Tree", "dijit/tree/dndSource", "dojo/domReady!"], function(Tree, dndSource) {
	tree = new Tree({
		model: usGov,
		// define the drag-n-drop controller
		dndController: dndSource
	}, "tree");
	tree.startup();
});
Now drag-n-drop operations should trigger our pasteItem() implementation and cause children arrays to be modified and saved. With the JsonRest store, the modifications that are saved via put() will trigger HTTP PUT requests to save the data back to the server.
Notifications
We aren't quite done yet. We also need to notify the Tree of the changes in the children. The Tree follows standard MVC principles of responding to data model changes rather than controller actions. This is extremely powerful because the view of the data can respond to changes regardless of what triggered the change (direct programmatic changes, drag-n-drop, etc.). The Tree listens for the "onChildrenChange", "onChange", and "onDelete" events. The Store API dictates that data updates happen via its put() method. We can extend put() to call these model change methods (triggering the Tree events), and then call the original put() method to complete the action on the store. Likewise we can call the onDelete event in the remove() method:
usGov = new JsonRest({
	put: function(object, options){
		// fire the onChildrenChange event
		this.onChildrenChange(object, object.children);
		// fire the onChange event
		this.onChange(object);
		// execute the default action
		return JsonRest.prototype.put.apply(this, arguments);
	},
	remove: function(id){
		// We call onDelete to signal to the tree to remove the child. The
		// remove(id) gets and id, but onDelete expects an object, so we create
		// a fake object that has an identity matching the id of the object we
		// are removing.
		this.onDelete({id: id});
		// note that you could alternately wait for this inherited add function to
		// finish (using .then()) if you don't want the event to fire until it is
		// confirmed by the server
	},
	// we also add event stubs so these methods can be
	// called before the listeners are applied
	onChildrenChange: function(parent, children){
		// fired when the set of children for an object changes
	},
	onChange: function(object){
		// fired when the properties of an object change
	},
	onDelete: function(object){
		// fired when an object is deleted
	},
	...
We have now defined our data model methods so our store can be used with the Tree for drag-n-drop. We can view the tutorial demo, but be aware that this demo does not implement any response to the HTTP PUT requests. The demo is just static files, so nothing is actually changed. If you do multiple drag-n-drop operations you will see objects reappear in old places due to the fact that the server is continually responding with the same static data.
Programmatic Data Changes
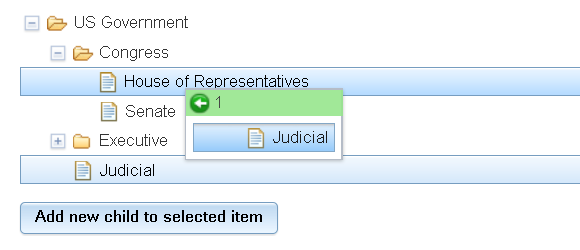
As we mentioned before, the Tree/model interface is designed so that the Tree responds to changes regardless of the trigger. Consequently, to add a new child, we can simply insert a child object into a parent's children array, save it with a put(), and the Tree will automatically respond. In the demo, a button triggers the addition of a child object using the following code:
// get the selected object from the tree
var selectedObject = tree.get("selectedItems")[0];
// check ensure an object is selected
if(!selectedObject){
	// alert and return if no selected object
	return alert("No object selected");
}
// get the full copy of the object
usGov.get(selectedObject.id).then(function(selectedObject){
	// add a new child
	selectedObject.children.push({
		name: "New child",
		id: Math.random()
	});
	// save it with a put().  The tree will automatically update the UI
	usGov.put(selectedObject);
});
And, we can remove children with the same approach. We could also change properties of objects, such as the name (the label of the nodes). In the demo, we listen for double-clicks to prompt for a new name for objects:
tree.on("dblclick", function(object){
	// node was double clicked, prompt for a new name
	object.name = prompt("Enter a new name for the object");
	// save the change, again the tree auto-updates
	usGov.put(object);
}, true);
In the end, we end up with the following:
require(["dojo/store/JsonRest", "dojo/store/Observable", "dijit/Tree", "dijit/tree/dndSource", "dojo/query", "dojo/domReady!"],
	function(JsonRest, Observable, Tree, dndSource, query) {

		usGov = JsonRest({
			target:"data/",
			mayHaveChildren: function(object){
				// see if it has a children property
				return "children" in object;
			},
			getChildren: function(object, onComplete, onError){
				// retrieve the full copy of the object
				this.get(object.id).then(function(fullObject){
					// copy to the original object so it has the children array as well.
					object.children = fullObject.children;
					// now that we have the full object, we should have an array of children
					onComplete(fullObject.children);
				}, function(error){
					// an error occurred, log it, and indicate no children
					console.error(error);
					onComplete([]);
				});
			},
			getRoot: function(onItem, onError){
				// get the root object, we will do a get() and callback the result
				this.get("root").then(onItem, onError);
			},
			getLabel: function(object){
				// just get the name
				return object.name;
			},

			pasteItem: function(child, oldParent, newParent, bCopy, insertIndex){
				var store = this;
				store.get(oldParent.id).then(function(oldParent){
					store.get(newParent.id).then(function(newParent){
						var oldChildren = oldParent.children;
						dojo.some(oldChildren, function(oldChild, i){
							if(oldChild.id == child.id){
								oldChildren.splice(i, 1);
								return true; // done
							}
						});
						store.put(oldParent);
						newParent.children.splice(insertIndex || 0, 0, child);
						store.put(newParent);
					}, function(error){
						alert("Error occurred (this demo is not hooked up to a real database, so this is expected): " + error);
					});
				});
			},
			put: function(object, options){
				this.onChildrenChange(object, object.children);
				this.onChange(object);
				return JsonRest.prototype.put.apply(this, arguments);
			},
			remove: function(id){
				this.onDelete({id: id});
				return JsonRest.prototype.remove.apply(this, arguments);
			}
		});
		tree = new Tree({
			model: usGov,
			dndController: dndSource
		}, "tree"); // make sure you have a target HTML element with this id
		tree.startup();
		query("#add-new-child").on("click", function(){
			var selectedObject = tree.get("selectedItems")[0];
			if(!selectedObject){
				return alert("No object selected");
			}
			usGov.get(selectedObject.id).then(function(selectedObject){
				selectedObject.children.push({
					name: "New child",
					id: Math.random()
				});
				usGov.put(selectedObject);
			});

		});
		query("#remove").on("click", function(){
			var selectedObject = tree.get("selectedItems")[0];
			if(!selectedObject){
				return alert("No object selected");
			}
			usGov.remove(selectedObject.id);
		});
		tree.on("dblclick", function(object){
			object.name = prompt("Enter a new name for the object");
			usGov.put(object);
		}, true);
});
Conclusion
The Tree is designed to properly separate the data model concerns from presentation, and the new object store can easily be extended with hierarchical logic to drive the Tree. The Tree provides important features such as keyboard navigation and accessibility. Also, the Tree and object store combination leverages the additional powerful functionality of the Tree including scalable lazy loading, drag-n-drop, and real-time response to data model changes. We encourage you to explore the Tree documentation in more depth to learn more about the Tree capabilities such styling, icon customization, and its API.