This tutorial is for Dojo 1.6 and may be out of date.
Up to date tutorials are available.
A Loading Overlay
In this tutorial, we’ll create an overlay that puts us in control of the user experience while parts of an application load in the background.
The Problem
Loading various scripts and other resources and building even a relatively simple UI can take time. As widgets are instantiated and data is fetched, distracting re-rendering of the page can occur. To avoid this, it’s common practice to overlay some or all of your page with a “loading” message that lets your users know what’s going on while simultaneously hiding any re-rendering or intermediate states in your UI that you don’t want them to see. The solution should not cause significant additional load time by requiring too many of its own dependencies, and it should avoid hard-wiring its behavior to any particular event so we can keep some flexibility in how we define “loaded”.
The Solution
Using methods from Dojo Base, we’ll inject an overlay element and use CSS to style and position it. A simple API will be developed to easily switch in and out of the loading state, and some simple animation will be used to provide a smooth transition between states. This will be accomplished using dojo.create, dojo.fadeOut, dojo.style, and dojo.ready.
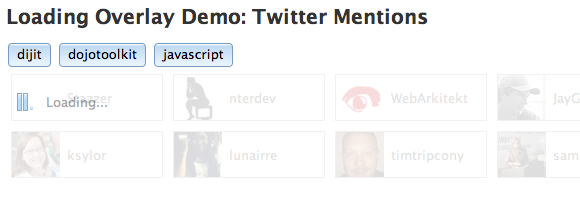
Here’s what we will be building:
Discussion
One of the challenges here is not the implementation itself, but juggling the priority of various requirements. One could imagine creating a complicated loader widget with a percentage bar, maybe even a non-modal or minimized state which allows the user to continue interacting with the rest of the page while other components load in the background. This not that recipe; we wanted to keep this implementation lightweight and strike a balance between demonstrating practical techniques for developing with Dojo, while keeping it simple enough to solve the most common case using a minimum of resources.
Step 1: Building the Overlay
If you use your DOM inspector of choice on the demo page, you’ll see the loading overlay appears as a child element of the <body>. It’s just a plain <div>, and its size and positioning are handled by CSS.
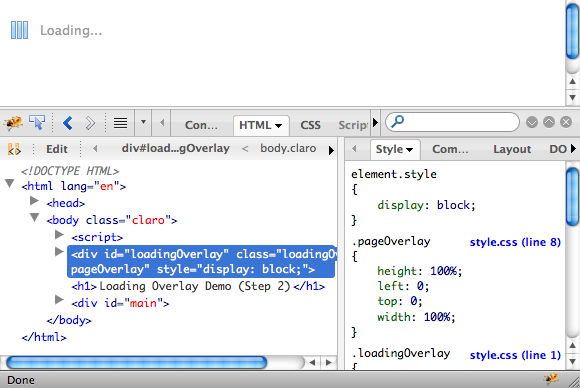
We’re creating the overlay element in JavaScript so that it doesn’t need to be hardcoded into every page we want to apply this behavior to. Since all of the ingredients to do this are included in Dojo Base, we don’t even necessarily need to wait for dojo.ready—as long as our code runs after dojo.js has been included on the page, and after the <body> element is created (but not necessarily closed/complete), we can add elements to the DOM at will.
Our code to generate the overlay looks like this:
<!DOCTYPE html>
<html lang="en">
	<head>
		<meta charset="utf-8">
		<title>Demo: Loading Overlay (Step 1)</title>
		<link rel="stylesheet" href="style.css" media="screen">
		<!-- load dojo and provide config via data attribute -->
		<script src="http://ajax.googleapis.com/ajax/libs/dojo/1.6/dojo/dojo.xd.js"
			data-dojo-config="isDebug: true">
		</script>
	</head>
	<body>
		<script>
		var wrapper = dojo.create("div", {
			id: "loadingOverlay",
			"class": "loadingOverlay pageOverlay",
			innerHTML: '<div class="loadingMessage">Loading...</div>'
		}, dojo.body());
		</script>
		<h1>Demo: Loading Overlay</h1>
		<p>The rest of your page...</p>
	</body>
</html>
The corresponding stylesheet looks like this:
.loadingOverlay {
    background:  #fff url('/js/dojo/1.6/dijit/themes/claro/images/loadingAnimation.gif') no-repeat 10px 23px;
    position: absolute;
    z-index: 1001;
    display: none;
}

.pageOverlay {
    top: 0;
    left: 0;
    height: 100%;
    width: 100%;
}

.loadingMessage {
    padding: 25px 40px;
    color: #999;
}
Because we’re injecting the overlay element using Dojo, if Dojo doesn’t load for some reason, or the user has JavaScript disabled, the overlay simply won’t be created. That’s good, because it means the site can still be used in those scenarios. The alternative approach of having the overlay element already in the page and visible on load means that, unless everything is working perfectly, the overlay remains enabled forever with no way for the user to dismiss it.
images directory, complete with icons, gradients, and other handy graphical assets used by the Dijit widgets. Even if you don’t use Dijit on your page, all these graphics are licensed under the same terms as the code and are ready for use.A module structure
There are three things we will be wanting from this overlay:
- Creation and set-up of the overlay element(s)
- Show the overlay to indicate loading in progress
- Hide the overlay to indicate loading complete
We'll turn this into three methods on an overlay object: init, show and hide.
To make management of private properties and state easier; and to avoid creating unnecessary globals, we’ll write a function that returns our loadingOverlay object.
The approach we'll use is sometimes known as the "module pattern" and looks like this:
var loadingOverlay = (function(){

	// local variables, only accessible to functions declared within this scope
	var foo = null;

	// return an object, with function properties (methods)
	return {
		init: function(){
			// perform any initialization

			// return 'this' as a convenience to faciliate chaining
			// e.g. overlay.init().show()
			return this;
		},
		show: function(){
			// show the overlay element
		},
		hide: function(){
			// hide the overlay element
		}
	};
})();
We can move the overlay creation code discussed earlier directly into the init function. The show and hide methods will reference the element we created as a overlayNode variable:
var overlayNode;
return {
	init: function(){
		// create the container element for the overlay
		// We store the reference in the overlayNode closure variable
		overlayNode = dojo.create('div', {
			id: 'loadingOverlay',
			'class': 'loadingOverlay pageOverlay',
			innerHTML: 'Loading...'
		}, dojo.body());

		return this;
	},
	...
Step 2: Show and Hide the Overlay
Our first attempt at adding functions to show and hide the overlay is really simple:{
init: function() { ... }
show: function(){
// show the overlay
dojo.style( overlayNode, {
display: 'block'
});
},
hide: function(){
// hide the overlay
dojo.style( overlayNode, {
display: 'none'
});
}
}
Our CSS has already positioned the overlay, so all we need to do in JavaScript is toggle the display style property to make it show up. While there are many different methods for doing this, using dojo.style helps prevent accidental specificity conflicts (versus adding/removing a class) and ensures any cross-browser behavior is normalized (versus setting style properties directly on the element).
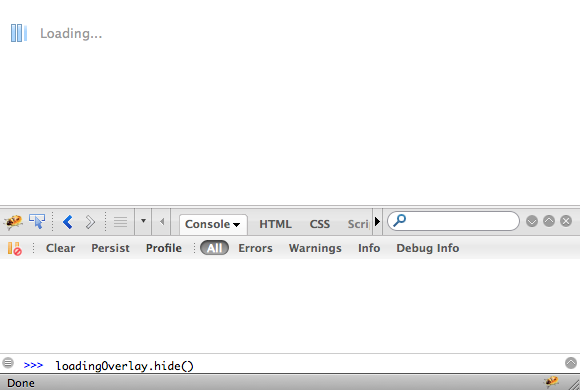
We can now test this from the console. Load up the page, and in your browser’s console type: loadingOverlay.hide():
Step 3: Adding a Transition
Simply toggling the display of the overlay makes for an abrupt transition. We can make this experience much nicer by fading out the overlay to reveal the page:
endLoading: function(){
	dojo.fadeOut({
		node: dojo.byId("loadingOverlay"),
		onEnd: function(node){
			dojo.style(node, "display", "none");
		}
	}).play();
}, …
dojo.fadeOut is part of Dojo Base, so is available and ready to use immediately. However, all it does is animates the opacity of the node; we need to add an additional step at the end of the animation to set display: none. Without this extra step, the overlay would still be present but invisible and would block clicks on the page.
Remember that animations happen asynchronously, so any statements after dojo.fadeOut will run before the animation completes. Review the effects and animation tutorials for more information on using animation.
Step 4: Defining “Loaded”
With the implementation of our API essentially complete, our last step is to choose when to call each function. You’re probably familiar by now with dojo.ready, so let’s hook that up:
// put up the loading overlay while the page initializes
loadingOverlay.init().show();

dojo.ready(function(){
	// take down the loading overlay when the page is ready
	loadingOverlay.hide();
});
That works, and perhaps it is enough. As you add code dependencies to your page with dojo.require, the overlay will stay up until they are all loaded. However, since we created an API for this overlay, we’ve got much more flexibility in how we define “loaded”. We can call loadingOverlay.hide() whenever we want and with its partner function loadingOverlay.show(), we can re-use this overlay later for other load-related events (such as Ajax requests).
To explore this, let's add some more context and see how it plays out with a page with multiple load events. Our plain demo page now makes a Twitter search API call to fetch a list of recent mentions of a given keyword. There's an initial "loaded" event when the page, its dependencies and the initial query are loaded. By clicking a button to make a new query, the page goes back into a loading state and we need to toggle the overlay again.
There's a new demo object with requestData and renderItems methods. These are responsible for getting the query results from Twitter into the page. The piece of interest for this tutorial is the integration of the loading overlay:
dojo.ready(function(){
	// load the initial query results
	demo.requestData('dojotoolkit').then(function(){
		// remove the loading overlay when complete
		loadingOverlay.hide();
	});

	dojo.query("#queries button").onclick(function(evt){
		// put up the overlay at the start of a new query
		loadingOverlay.show();
		// clear out the old content
		dojo.empty("demoList");

		// request the new content
		demo.requestData( evt.target.innerHTML ).then(function(){
			// remove the loading overlay when complete
			loadingOverlay.hide();
		});
	});
});
The demo.requestData function returns a Deferred object; it lets us add callbacks that will be executed when the request is complete. (You can find out more about this technique in the Getting Started with Deferreds tutorial.) Up to this point, the loading overlay is still visible, so instead of simply adding the code to hide it in a dojo.ready block, we can hide it here in the requestData callback.
The dojo.query statement sets up a click handler on each of the buttons to issue a new Twitter query. We put up the loading overlay at the start of this operation and take it down in the requestData callback.
Polish and refinements
Although the demo is functional, to really tighten up there are a few refinements needed. If you clicked the buttons fast enough, the requests stack up and we can end up with overlapping fadeOut animations and even rendering the same results multiple times.
To make it reentrant we can add guards to handle both these problems:
dojo.ready(function(){
	// load the initial query results
	var request = demo.requestData('dojotoolkit').then(function(){
		request = null;
	});

	dojo.query("#queries button").onclick(function(evt){
		if(request){
			// cancel an in-flight request
			request.cancel();
		}
		// put up the overlay at the start of a new query
		loadingOverlay.show();
		// clear out the old content
		dojo.empty("demoList");

		// request the new content
		request = demo.requestData( evt.target.innerHTML ).then(function(){
			request = null;
		});
	});
});
For the animation we make changes in our loadingOverlay object
var loadingOverlay = (function(){
	var overlayNode = null,
		hideAnim = null;

	return {
		overlayId: "loadingOverlay",
		init: function(containerNode){
			...
		},
		show: function(){
			// stop any in-progress hide animation
			hideAnim && hideAnim.stop();

			// show the overlay
			dojo.style( overlayNode, {
				display: 'block',
				opacity: 1
			});
		},
		hide: function(){
			if(!hideAnim){
				// handle the case where repeated calls to hide() are made
				// the animation object is stored in a closure variable
				hideAnim = dojo.fadeOut({
					...
				}).play();
			}
		}
	};
})();
Conclusion
Judicious application of just a few Dojo methods has created a nicer user experience and put you the developer in control of what you load when, and what your user sees in the meantime. We've applied the module pattern with Dojo to contain and manage the solution; selectively exposing methods and properties for use on the page. This recipe's solution is of course just one way to tackle the stated problem, but even with the refinements with the Twitter demo integration, it remains simple, lightweight and readily extended in any direction your requirements take you.