This tutorial is for Dojo 1.6 and may be out of date.
Up to date tutorials are available.
A Loading Overlay
In this tutorial, we'll create an overlay that puts us in control of the user experience while the loading of dependencies and rendering of the UI takes place in the background.
Introduction: The Problem
Loading the various scripts and other resources and setting up even a relatively simple UI can take time. As widgets are instantiated and data is fetched, you can get distracting re-rendering of the page. So, it's common practice to overlay some or all of your page with a "loading" layer that lets your users know what's going on and hides any re-rendering or intermediate states in your UI. The solution should not compound the problem bringing too many of its own dependencies, and should avoid hard-wiring its behavior to any particular event, so we can keep some flexibility in how we define "loaded".
Solution
Use methods from dojo Base to inject an overlay element with CSS to style and position it. A simple page-level API to put the page in and out of a loading state wraps an equally simple implementation. dojo.fadeOut provides a smooth transition between states.
You will need:
- dojo.create
- dojo.fadeOut, or your animation of choice
- A dash of dojo.style, dojo.ready and optionally dojo.hitch
- CSS for the overlay style
Here's how it plays out:
var demo = {
	endLoading: function() {
		dojo.fadeOut({
			node: dojo.byId('loadingOverlay'),
			onEnd: function(node){
				dojo.style(node, 'display', 'none');
			}
		}).play()
	},
	startLoading: function() {
		dojo.style( dojo.byId('loadingOverlay'), {
			display: 'block',
			opacity: 1
		});
	}
};

dojo.ready(function() {
	demo.endLoading();
});
...And here's one we prepared earlier:
View DemoDiscussion
One of the challenges here is not the implementation itself, but juggling the priority of requirements. You can imagine a loading widget which we can show and hide at will, features a loading bar with percentage increments, maybe even a non-modal or minimized state which allows the user to continue interacting with the rest of the screen while stuff loads in the background. This is not that recipe. We want to keep it light and simple and solve the common case: a potentially multi-step loading sequence during which time we don't want to allow the user to see or interact with the UI.
Most of the dojo ingredients for this recipe are in dojo "Base". As such we don't necessarily need to wait for dojo.ready, and certainly not window.onload - which happens far too late to be useful.
Provided our code runs after the dojo.js script tag which makes dojo's Base methods available, and after the <body> element is created (but not necessarily closed/complete) we can inject elements and work with the DOM at will.
Building the Overlay
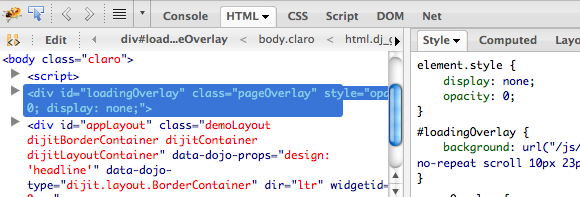
If you use your DOM inspector of choice on the demo page, you'll see the overlay as a child element of the body. It's a div with the associated CSS to size and position it on the page.
We're going to create the overlay element in javascript to avoid needing to hard-code it into every page we want to apply this behavior to. Let's get that bit working before we worry about the rest.
<!DOCTYPE HTML>
<html lang="en">
	<head>
		<meta charset="utf-8">
		<title>Demo: Loading Overlay (Step 1)</title>
		<link rel="stylesheet" href="style.css" media="screen">
		<!-- load dojo and provide config via data attribute -->
		<script src="//ajax.googleapis.com/ajax/libs/dojo/1.6.3/dojo/dojo.xd.js"
				data-dojo-config="isDebug: true,parseOnLoad: true">
		</script>
	</head>
	<body>
		<script>
		var wrapper = dojo.create('div', {
			id: 'loadingOverlay',
			'class': 'pageOverlay',
			innerHTML: '<div class="loadingMessage">Loading...</div>'
		}, dojo.body());
		</script>
		<h1>Demo: Loading Overlay</h1>
		<p>The rest of your page...</p>
	</body>
</html>
The stylesheet looks like this:
.pageOverlay {
    top: 0;
    left: 0;
    position: absolute;
    height: 100%;
    width: 100%;
    z-index: 1001;
    display: block;
}

#loadingOverlay {
    background:  #fff url('//ajax.googleapis.com/ajax/libs/dojo/1.6.3/dijit/themes/claro/images/loadingAnimation.gif') no-repeat 10px 23px;
}

.loadingMessage {
    padding: 25px 40px;
    color: #999;
}
...and you should see something like this:

images directory, with icons, gradients and other handy graphic assets used by the Dijit widgets - including this loading animation.
Even if you don't use Dijit on your page, all the graphics are licensed under the same terms as the code and ready for your use.Show and Hide the Overlay
We've used dojo.create to make the overlay DIV. It is given an id we can reference it with, and the class to pick up the styling.
This snippet is placed directly inside the <body> tag, with the dojo.js in the <head>.
As we don't depend on any code outside of dojo.js (Base), we don't need to use dojo.ready to wait for dependencies to load.
This way if the rest of the page takes a while to load in, it happens out of sight behind the loading overlay. Perception is everything: getting something in front of the user as soon as possible makes the page feel faster, even if the total time to load is exactly the same.
Now the element is there, we just need the functions to show and hide it.
It frequently turns out to be handy to have an object that you can hang page-level properties and methods like this on, so we'll attach them to a 'demo' object.
That's a stand-in for your namespace, or perhaps your main page or application object.
The first cut at showing and hiding the overlay can be really simple:
var demo = {
	endLoading: function() {
		dojo.style( dojo.byId('loadingOverlay'), 'display', 'none');
	},
	startLoading: function() {
		dojo.style( dojo.byId('loadingOverlay'), 'display', 'block');
	}
};
The CSS has already positioned, sized and z-indexed the overlay, we just need to toggle the style.display property to make it show up.
We could also have used dojo.addClass and dojo.removeClass to the same effect if we had a class with the same display:none rule.
In fact Dijit provides one in dijit/themes/dijit.css: dijitHidden, but not only do we add another dependency there, and a load of other rules we're not (yet) using,
we also get into an issue where another class with higher specificity could override ours and have no effect.
You could also set the display property directly with dojo.byId('loadingOverlay').style.display='none', but as dojo.style smooths over some cross-browser issues for us, and gives us a nice syntax for setting multiple properties at once, it's a good habit to keep.
We can test this from the console. Load up the page, and in your browser's console invoke the function:
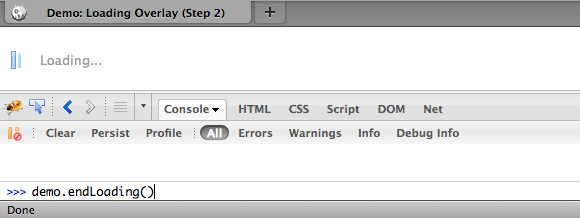
Noscript Fallback
The way we are doing this, the overlay markup already in the page and z-indexed over the page content, creates a problem, as unless the function to hide the overlay runs, the overlay stays up with no way for the user to dismiss it and see the content behind.
In that scenario, a <noscript> block might be prudent:
<noscript>
	<style>
		/* ensure no-javascript browsers arent obstructed */
		#loadingOverlay { display: none!important; }
	</style>
</noscript>
Adding a Transition
Simply toggling the display of the overlay makes for an abrupt transition. We can make this experience much nicer by fading it out to reveal the page behind:
endLoading: function() {
	dojo.fadeOut({
		node: dojo.byId('loadingOverlay'),
		onEnd: function(node){
			dojo.style(node, 'display', 'none');
		}
	}).play()
},
dojo.fadeOut is in dojo Base, so is available and ready to use immediately here, but it simply animates the opacity of the node we provide. We need to add an additional step at the end of that animation to set display:none, otherwise the overlay would still be present but invisible and would block clicks on the page.
Remember that animations happen asynchronously, so any statements after our dojo.fadeOut(..) will run before the animation complete. We use the onEnd hook provided by all dojo animations to add that step. Review the effects and animation tutorials for more details on how you can adjust to taste.
Defining "Loaded"
With the functions defined, we just need to pick an event or moment to call them. You're probably familiar by now with dojo.ready, so let's hook that up:
dojo.ready(function(){
	demo.endLoading();
});
That works, and perhaps its enough. But what we've bought ourselves here is flexibility on how we define "loaded". We can call demo.endLoading() whenever we want, and with demo.startLoading we can even set up multi-stage loading so the user sees progress happenning.
Again, its all about perception. If you've got for example a request to fetch data for your app, or images to preload we can take control of the loading sequence, and use our start/endLoading methods to signal what's going on.
For that to make sense we need to put back some of the complexity into our page, and see our solution in something more like "real-world" conditions. The demo sets up a dijit-based layout using a TabContainer and an Editor and a bunch of ContentPanes. We should be using a build to compress the code each represents, and to minimize the number of HTTP requests being made. But there's no getting away from the fact that each new component adds bytes to download.
Here's the list of requires:
dojo.require("dijit.layout.BorderContainer");
dojo.require("dijit.layout.TabContainer");
dojo.require("dijit.layout.ContentPane");

dojo.require("dijit.Editor");
dojo.require("dijit._editor._Plugin");
dojo.require("dijit._editor.plugins.AlwaysShowToolbar");
dojo.require("dijit._editor.plugins.FontChoice");  // 'fontName','fontSize','formatBlock'
dojo.require("dijit._editor.plugins.TextColor");
dojo.require("dijit._editor.plugins.LinkDialog");
Planning a Load Sequence
We know we want the overlay up until at least the layout is complete. But we don't actually need the editor immediately, so we can break it out:
initEditor: function() {
	if(!dijit.byId("edit")) {
		dojo.require("dijit.Editor");
		dojo.require("dijit._editor._Plugin");
		dojo.require("dijit._editor.plugins.AlwaysShowToolbar");
		dojo.require("dijit._editor.plugins.FontChoice");  // 'fontName','fontSize','formatBlock'
		dojo.require("dijit._editor.plugins.TextColor");
		dojo.require("dijit._editor.plugins.LinkDialog");
		dojo.ready(function(){
			dijit.byId("tabs").addChild(new dijit.Editor({
				id: "edit",
				title: "Edit"
			}));
		});
	}
}
Now, we can load just what we initially need, take down the overlay, and load the rest in the background. The editor has gone from being created declaratively in the markup, to programmatically once its dependencies are loaded.
Finally, a little setTimeout introduces a barely perceptible pause to let our older browsers catch up:
dojo.ready(function(){
	demo.endLoading();
	setTimeout(dojo.hitch(demo, "initEditor"), 500);
});
Other options here are to take down the overlay, and lazily-create the editor when we first click on that tab, bracketed by calls to demo.startLoading and demo.endLoading. Experiment.
Conclusion
Judicious application of just a few Dojo methods has created a nicer user experience, and put you the developer in control of what you load when, and what your user sees in the meantime. This recipe's solution is of course just one way to tackle the stated problem, but this one is simple, lightweight and readily extended in any direction your requirements take you.
Colophon
- Effects with Dojo (for use of dojo.fadeOut)
- Layout with Dijit
- dojo.create
- dojo.style
- dojo.hitch
- dojo.ready (aka dojo.addOnLoad)