dojox.calendar
dojox.calendar allows to display events in time and edit them.
Contents
Introduction
The dojox calendar widget displays events from a data store along time using widespread representation and allows to interactively edit the position in time and duration of these events.
Note: The calendar is not supported on Internet Explorer 6. On IE7 and above a standard doctype must be set on the page that includes the calendar.
Creating a Calendar
The calendar widget is available on the dojox.calendar package.
You can create a calendar widget either with markup or programmatically.
The following example shows how to declare a calendar widget in markup:
require(["dojo/parser", "dojox/calendar/Calendar"]);
<link rel="stylesheet" href="{{baseUrl}}/dojox/calendar/themes/claro/Calendar.css">

<div data-dojo-type="dojox/calendar/Calendar"
     data-dojo-props="dateInterval:'day'"
     style="position:relative;width:500px;height:500px">
</div>
The following example shows how to declare a calendar widget programmatically:
require(["dojo/parser", "dojo/ready", "dojox/calendar/Calendar"],
  function(parser, ready, Calendar){
    ready(function(){
      calendar = new Calendar({
                   dateInterval: "day",
                   style: "position:relative;width:500px;height:500px"
                }, "someId");
              }
          )}
  );
<link rel="stylesheet" href="{{baseUrl}}/dojox/calendar/themes/claro/Calendar.css">

<div id="someId" >
</div>
Configuring Calendar data
The calendar widget is populated with the list events using a store set on its store property.
The Calendar can connect to any implementation of the dojo.store.api.Store interface that implements get/query and id management (getIdentity).
If the Calendar is displaying live data (ie. data that can be edited by the Calendar itself or data that can change outside of the Calendar), the store must be a dojo.store.Observable.
Manage store errors
You might want to listen to store query errors, for that you can use the promise returned by the store setter:
require(["dojox/calendar/Calendar", "dojo/_base/Deferred", ..], function(Calendar, Deferred, ...){
  var calendar= new Calendar(...);
  Deferred.when(calendar.set("store", mystore), function onOk() {}, function onFail() {});
});
Data mapping
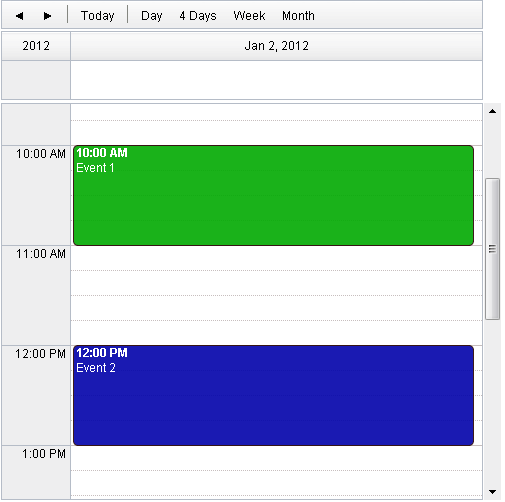
In order to display events, the widget must determine for each event its start and end time. It will look by default at the “startTime” and “endTime” properties of the store item.
var someData = [
  {
    id: 0,
    summary: "Event 1",
    startTime: new Date(2012, 0, 1, 10, 0),
    endTime: new Date(2012, 0, 1, 12, 0)
  }
];

calendar = new Calendar({
  date: new Date(2012, 0, 1),
  store: new Observable(new Memory({data: someData})),
  dateInterval: "day",
  style: "position:relative;width:500px;height:500px"
}, "someId");
The property names can be configured by setting the “startTimeAttr” and “endTimeAttr”.
var someData = [
  {
    id: 0,
    summary: "Event 1",
    begin: new Date(2012, 0, 1, 10, 0),
    end: new Date(2012, 0, 1, 12, 0)
  }
];

calendar = new Calendar({
  date: new Date(2012, 0, 1),
  startTimeAttr: "begin",
  endTimeAttr: "end",
  store: new Observable(new Memory({data: someData})),
  dateInterval: "day",
  style: "position:relative;width:500px;height:500px"
}, "someId");
The value retrieved can be a date directly usable by the calendar or must converted into a date. In the latter case, the decodeDate() and encodeDate() functions must be set to respectively decode the object into a date and encore the date into a custom object after an editing.
var someData = [
  {
    id: 0,
    summary: "Event 1",
    startTime: "2012-01-01T10:00",
    endTime: "2012-01-01T12:00"
  }
];

calendar = new Calendar({
  date: new Date(2012, 0, 1),
  decodeDate: function(s){
    return stamp.fromISOString(s);
  },
  encodeDate: function(d){
    return stamp.toISOString(d);
  },
  store: new Observable(new Memory({data: someData})),
  dateInterval: "day",
  style: "position:relative;width:500px;height:500px"
}, "someId");
In addition to the start and end time, a summary is retrieved on the store item, by default using the “summary” property name (use summaryAttr property to change the property name).
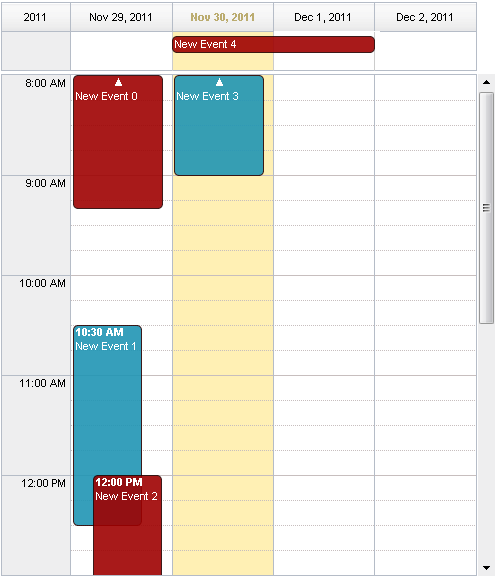
The event can also be flagged “all day”. An all-day event is a particular event that span over one or several days and that starts at the beginning of a day to finish at the beginning of another day.
All-day events can be displayed differently: for example by default they are displayed in the secondary sheet of a column view. The editing behavior of an all-day event is also different to keep the all-day constraint. The calendar is looking to the “allDay” property of a data store item to determine if an item is an all day event or not (boolean value expected). The property name can be configured by setting the allDayAttr property.
Time range definition
- The displayed time range can be defined in two ways:
- Set date, dateInterval, dateIntervalSteps properties,
- Or set startDate and endDate properties.
The date property defines the reference date.
The dateInterval property defines the interval (day, week, month) and dateIntervalSteps the number of intervals.
- So, depending of these dateInterval values, if ‘n’ is the dateIntervalSteps value, the time range will be:
- “day” - n days from the reference date,
- “week” - n week from the first day of week that contains the reference date,
- “month” - n months from the first day of the month that contains the reference date.
The following example shows how to display 2 weeks, whose first week contains the 1st of January 2012.
<div data-dojo-type="dojox/calendar/Calendar"
     data-dojo-props="date: new Date(2012, 0, 1), dateInterval:'week', dateIntervalSteps:2"
     style="position:relative;width:500px;height:500px"></div>
When using the definition using the startDate and endDate properties, the date property must be explicitely null. The time of day of these date are not taken into account and the date defined by endDate is included in the time range.
The following example shows how to define the time range from the 1st of January 2012 to the 9th of January 2012.
<div data-dojo-type="dojox/calendar/Calendar"
     data-dojo-props="startDate: new Date(2012, 0, 1), endDate: new Date(2012, 0, 9)"
     style="position:relative;width:500px;height:500px"></div>
Styling renderers
A CSS pseudo class can be specified for each event to be applied to the renderers for this particular event. Set the cssClassFunc function that returns the CSS pseudo class name for a store item.
For example, we can use this feature to change the color of a renderer depending on a calendar property of the store item as displayed in the following example:
.claro .dojoxCalendarEvent.Calendar1 .bg {
  background-color: #00AA00;
}
.claro .dojoxCalendarEvent.Calendar1.Hovered .bg {
  background-color: #00FF00;
}
.claro .dojoxCalendarEvent.Calendar1.Selected .bg {
  background-color: #004400;
}
.claro .dojoxCalendarEvent.Calendar2 .bg {
  background-color: #0000AA;
}
.claro .dojoxCalendarEvent.Calendar2.Hovered .bg {
  background-color: #0000FF;
}
.claro .dojoxCalendarEvent.Calendar2.Selected .bg {
  background-color: #000044;
}
var someData = [
  {
    id: 0,
    summary: "Event 1",
    startTime:  new Date(2012,0, 1, 10),
    endTime: new Date(2012,0, 1, 12),
    calendar: "Calendar1"
  },
  {
    id: 1,
    summary: "Event 2",
    startTime:  new Date(2012,0, 1, 14),
    endTime: new Date(2012,0, 1, 15),
    calendar: "Calendar2"
  }
];

calendar = new Calendar({
  date: new Date(2012, 0, 1),
  cssClassFunc: function(item){
    return item.calendar;
  },
  store: new Observable(new Memory({data: someData})),
    dateInterval: "day",
    style: "position:relative;width:500px;height:500px"
}, "someId");
For further customization, custom renderers can be created. See dedicated section of advanced configuration.
Views
The calendar is embedding two views: the columns view and the matrix view.
The views are displaying time and events differently and are more adapted for a given time range to display.
- The calendar is using (by default):
- the columns view for time ranges that last from one day to seven days.
- the matrix view for time ranges that last more than seven days.
Another optional view is the month columns view that can be used to display one or several entire months.
See Advanced configuration to change this behavior.
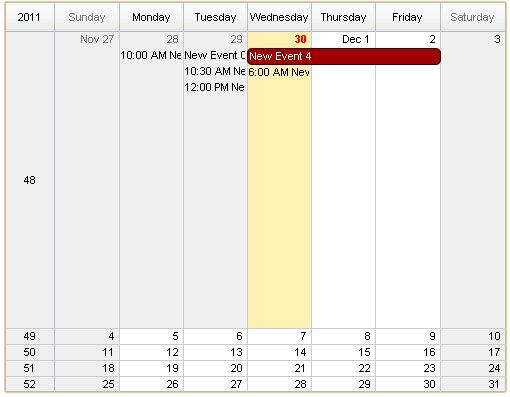
Columns View
The columns view is displaying one column per day.
- It view is made of two sheets:
- A main sheet that shows all non all-day events vertically.
- A secondary sheet that displays, by default, all-day events horizontally.
See Advanced configuration section to see how to change this behavior.
This view is accessible through the columnView property of the calendar widget.
- The main properties of the columns view are:
- startDate * - The date of the first column,
- columnCount * - The number of column to display,
- minHours - The first hour displayed by the main sheet,
- maxHours - The last hour displayed (excluded),
- hourSize - The desired size in pixels of one hour,
- timeSlotDuration - The duration of minutes of the time slot (must be a divisor of 60),
Properties with an (*) are computed by the calendar widget.
See Advanced configuration for more advanced properties like layout properties and renderers.
To specify constructor parameters of the column view, set the columnViewProps property as show in the following example:
<div data-dojo-type="dojox/calendar/Calendar"
     data-dojo-props="dateInterval:'day',columnViewProps:{minHours:6}"
     style="position:relative;width:500px;height:500px"></div>
Note: The ColumnView can be replaced by the SimpleColumnView widget which is a columns view without the secondary sheet. See advanced configuration to see how to use this alternate view.
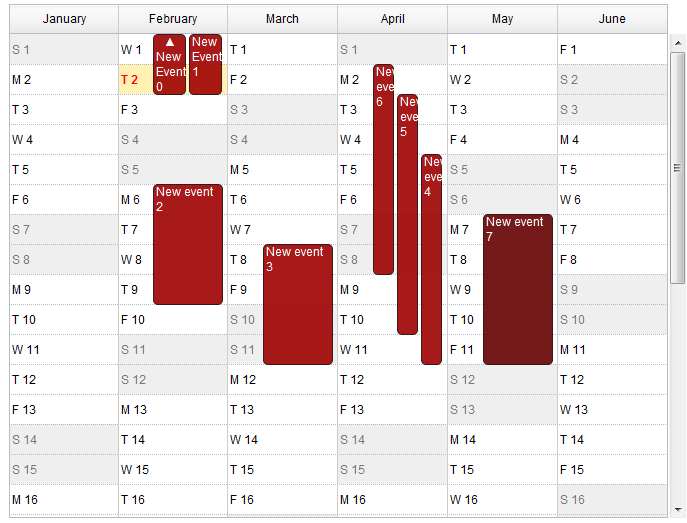
Matrix View
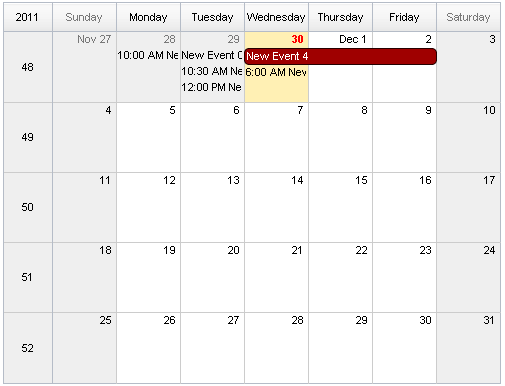
The matrix view is displaying a matrix in which each day is a cell. Time is flowing horizontally.
This view is accessible through the matrixView property of the calendar widget.
- The main properties of the columns view are:
- startDate * - The date of the first cell,
- rowCount * - The number of rows to display,
- columnCount * - The number of columns to display,
- refStartTime - (optional) Start time of the time range of interest,
- refEndTime - (optional) end time of the time range of interest,
- expandDuration - Duration in milliseconds of the row expand animation,
- expandEasing - Easing of the row expand animation
Properties with an (*) are computed by the calendar widget.
See advanced configuration dedicated section for more advanced properties like layout properties and renderers.
To specify constructor parameters of the matrix view, set the matrixViewProps property as show in the following example:
<div data-dojo-type="dojox/calendar/Calendar"
     data-dojo-props="matrixViewProps:{expandDuration:0}"
     style="position:relative;width:500px;height:500px"></div>
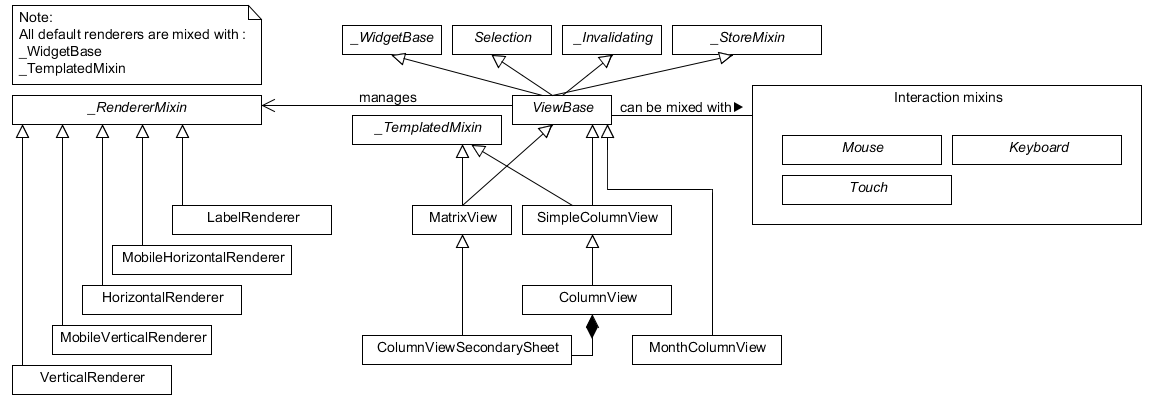
The event renderers that are overlapping are stacked vertically.
Sometimes there is not enough room to show all renderers. In that case, an expand renderer is displayed at the bottom of the cell to indicate that some events are not visible.
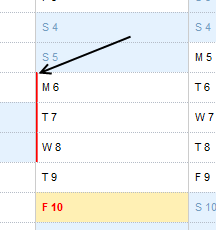
The matrix view allows to expand a row to see more events.
By default the calendar is using this feature when an expand renderer is clicked or when an row header cell is clicked.
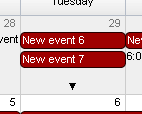
In the following image the first row is expanded:
Month Columns View
The month columns view is displaying one column per month.
This view is not in the calendar by default but it can be added, see tests/ExtendedCalendar sample class and advanced configuration for more information.
- The main properties of the columns view are:
- startDate * - The date of the first column,
- columnCount * - The number of column to display,
- daySize - The desired size in pixels of one day.
Properties with an (*) are computed by the calendar widget.
By default, this is view is using vertical renderers to show all-day events and events longer than one day.
If a day is containing one or several hidden items (i.e. short events by default), a decoration is displayed on the grid cell.
See Advanced configuration for more advanced properties like layout properties and renderers.
Interactions
Selection
Properties
- The selectionMode property controls the selection, this property can take the following values:
- “none” - no selection is possible.
- “single” - only one item can be selected at most.
- “multiple” - zero or several items can be selected.
The selectedItems property contains the list of selected items from the data store.
The selectedItem property contains the last selected item.
Using the mouse
To select an item, simply click on an renderer.
To deselect an item, press the control key and click on a renderer.
If the selection mode is “multiple”, you can extend the selection or deselect an item by pressing the control key and click on a renderer.
Using the keyboard
If the calendar widget has the focus, press the left or right arrow keys to select an item.
To move only the focus on an item and not select it at the same time, press left or right arrow keys while maintaining the control key.
To deselect an item or extend selection (if selection mode is “multiple”), move the focus to an renderer and press the space bar while maintaining the control key.
Using the touch events
To select an item, simply tap on it.
Item editing
The calendar widget allows to move and resize an event.
Only one event can be edited at a time.
Note: for more information on item editing behavior and events, See dedicated section of advanced configuration.
Using the mouse
To move an event, press the mouse button over the body of a renderer, drag the event at the desired position and release the mouse button.
To resize an event, press the mouse button over the start or end of a renderer, drag it to the desired position and release the mouse button.
If you press the escape key while editing an item, the editing gesture will be canceled.
Using the keyboard
If an item has the focus (see selection section), press the enter key to edit the event.
In editing mode:
- press the arrow keys to move the events,
- press the up or down arrow keys while maintaining the control key to resize the event by moving the end of the event.
- press the enter key to validate the changes and leaving the edit mode.
- press the escape key to cancel the changes and leaving the edit mode.
Using touch events
To enter in edit mode press a renderer for a small amount of time, until the renderer visually change its state.
In editing mode:
- press and move the body of the renderer to move the event.
- press and move one (or both) of the resize areas to resize the event.
- tap out the renderer to validate the changes and leave the edit mode.
Navigation buttons

By default the calendar template defines 7 buttons to navigate in time.
| Button | Action |
|---|---|
| Previous | Go the previous time range. For example if four days are displayed, show the four previous days. |
| Next | Go to the next time range. For example if four days are displayed, show the four next days. |
| Today | Show the current day. |
| Day | Shows the day defined by the “date” property or the current day if the date property is null. |
| Four days | Shows four days from the the day defined by the day property of the current day if the date property is null. |
| Week | shows the week that contains the day defined by the “date” property. |
| Month | shows the month that contains the day defined by the “date” property. |
The following functions are also exposed to help navigation:
- nextRange(): show next time range.
- previousRange: show previous time range.
- goToday(): show the current day.
These buttons and methods are just shortcuts that define the date, dateInterval and dateIntervalSteps properties.
Event creation
Events are retrieved in the data store. To programmatically add a new event, the developer can use the store put() method.
The calendar is allowing to interactively create an event by pressing the mouse button on the grid and dragging the mouse to set the duration of the event.
To enable the creation, the createOnGridClick property of the calendar must be set to true (false by default). Furthermore, a custom function creating the item must be set on the createItemFunc property.
- This custom function is taking three arguments:
- The current view,
- The date of the clicked location,
- The mouse event.
The following example is showing an implementation of the createItemFunc that is creating an event if and only if the control key only is pressed during the interaction. The created event initial position and duration is depending on the current view.
var createItem = function(view, d, e){

  // create item by maintaining control key
  if(!e.ctrlKey || e.shiftKey || e.altKey){
    return;
  }

  var start, end;
  var colView = calendar.columnView;
  var cal = calendar.dateFuncObj;

  if(view == colView){
    start = calendar.floorDate(d, "minute", colView.timeSlotDuration);
    end = cal.add(start, "minute", colView.timeSlotDuration);
  }else{
    start = calendar.floorToDay(d);
    end = cal.add(start, "day", 1);
  }

  var item = {
    id: id,
    summary: "New event " + id,
    startTime: start,
    endTime: end,
    allDay: view.viewKind == "matrix"
  };

  id++;

  return item;
}

calendar.set("createOnGridClick", true);
calendar.set("createItemFunc", createItem);
Calendar events
The calendar is the source of specific events.
The following table is listing these events:
| Event | Description | Main Properties |
|---|---|---|
| itemClick | A renderer of an event has been clicked | item |
| itemDoubleClick | A renderer of an event has been double-clicked | item |
| itemContextMenu | A renderer of an event has been context-clicked | item |
| gridClick | The grid (background of the calendar) has been clicked | date |
| gridDoubleClick | The grid has been double-clicked | date |
| change | The selection has changed | item |
| rowHeaderClick | (Matrix view) a cell of the row header has been clicked | index, date |
| expandRendererClick | (Matrix view) a expand renderer has been clicked | rowIndex, columnIndex |
| columnHeaderClick | (Matrix view) a cell of the column header has been clicked | index, date |
| onExpandAnimationEnd | (Matrix view) an expand or collapse row animation has ended | null |
| onItemEditBegin | The event is entering in editing mode item | null |
| onItemEditBeginGesture | An editing gesture of an event is beginning item | editKind |
| onItemEditMoveGesture | An event is being moved | item |
| onItemEditResizeGesture | An event is being resized | item |
| onItemEditEndGesture | An editing gesture has been finished | item, editKind |
| onItemEditEnd | The event is leaving editing mode | item, completed |
- Note: The change event is different than the itemClick event:
- A change event with a null item value is sent if the grid is clicked.
- If an already selected item is clicked the change event is not dispatched but the itemClick event is.
To react on a calendar event use the on() method to register a listener as shown in the following event:
calendar.on("itemClick", function(e){
  console.log("Item clicked", e.item.summary);
});
Advanced configuration
Class diagram
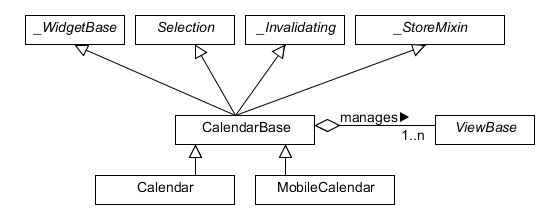
| Class | Description |
|---|---|
| ViewBase | The base class of calendar views. |
| CalendarBase | The base calendar class that is managing a set of calendar views and exposes time range definition properties. |
| Calendar | The desktop specific calendar that defines a column view and a matrix view with keyboard and mouse interactions enabled and default renderers |
| Class | Description |
|---|---|
| MobileCalendar | The mobile specific calendar that defines a column view and a matrix view with touch interactions enabled and specific default renderers. |
| MatrixView | The view that displays days as a matrix of days. |
| SimpleColumnView | The view that displays each day as a column. |
| ColumnView | A SimpleColumnView with a secondary sheet that is showing all day events. |
| ColumnViewSecondarySheet | A MatrixView designed to be integrated as a secondary sheet of a ColumnView. |
| MonthColumnView | The view that displays each month as a column. |
| Mouse | A mixin that enables interactions on events using the mouse. |
| Keyboard | A mixin that enables interactions on events using the keyboard. |
| Touch | A mixin that enables interactions on events using the touch events |
| _RendererMixin | Base class of event renderers. |
| VerticalRenderer | The default event renderer class of vertical renderers used in columns view main sheet. |
| MobileVerticalRenderer | The default vertical renderer class for mobile environment. |
| HorizontalRenderer | The default event renderer class of horizontal renderers used in matrix view and in columns view secondary sheet. |
| MobileHorizontalRenderer | The default horizontal renderer class for mobile environment. |
| LabelRenderer | The default renderer class for labels used in matrix view. |
Calendar
Calendar views animations
- On modern browsers, the calendar is performing an animation when:
- The displayed time interval is changing and/or
- The current view is changing to display the time interval.
To disable this animation set the calendar animateRange property to false (true by default).
To change the duration of the animation set the animationRangeDuration property (400 by default).
For the most skillful developers, subclass the _animateRange() method to implement your own animation.
View management
The default views are created in the _createDefaultViews() function. To specify the views to use instead of the default views, set the views property.
The view switching is determined according to the displayed time interval.
The calendar is going through the following steps:
- One or several properties that are defining the displayed time range are changed,
- The new displayed time interval is computed,
- The _computeCurrentView() function is called to determine which view should be used to properly display the time range.
- The view is configured (setting startDate, columnCount etc) in the _configureView() function.
- If the current view has changed, show the new view.
You can override these key function change the current and/or change the configuration of this view.
The following example shows the creation of custom views and a change the default view to display two weeks:
var secondarySheetClass = declare([ColumnViewSecondarySheet, CalendarKeyboard, CalendarMouse]);

var colView = declare([ColumnView, Keyboard, Mouse])({
  secondarySheetClass: secondarySheetClass,
  secondarySheetProps: {
    horizontalRendererHeight: 16
  },
  verticalRenderer: VerticalRenderer,
  horizontalRenderer: HorizontalRenderer,
  expandRenderer: ExpandRenderer
});

var matrixView = declare([MatrixView, Keyboard, Mouse])({
  horizontalRenderer: HorizontalRenderer,
  labelRenderer: LabelRenderer,
  expandRenderer: ExpandRenderer,
  verticalGap:4
});

var calendar = new CalendarBase({
  views: [colView, matrixView],
  columnView: colView,
  matrixView: matrixView,
  _computeCurrentView: function(startDate, endDate, duration){
    return duration <= 14 ? this.views[0] : this.views[1];
  },
  dateInterval: "week",
  dateIntervalSteps: 2
}, "calendarNode");
Right-to-left
See http://dojotoolkit.org/reference-guide/quickstart/internationalization/bi-directional-text.html
To have a correct rendering in right-to-left display, you must import the calendar_rtl.css file in addition to the calendar.css file.
Bidi
The calendar is also supporting the “textDir” property.
Import the dijit._BidiSupport class and set the “textDir” property to “rtl”, “ltr” or “auto” to set the contextual text direction.
Alternate calendars
The calendar is using by default the gregorian calendar to display time, but the alternate calendars defined in dojox.date package can be set on the calendar.
In the constructor, set the datePackage to change the calendar. Remember to use the corresponding date object in the input data store.
The following example shows to how to set the Hebrew calendar:
new Calendar({datePackage: "dojox.date.hebrew"}, "calendarNode");
Date/time formatting
The displayed dates labels are formatted using dojo formatters. If no specific calendar is specified the dojo.date.locale object is used, otherwise it is the dojox.date.XXXX.locale.
The formatter is using the CLDR (http://cldr.unicode.org/) to determine according to the current locale the correct date format to use and how to properly format the date.
The date format patterns can be specified by setting view specific properties or functions defined in following view sections.
The calendar exposes an formatItemTimeFunc property allowing to format the time displayed on renderers.
For example for a gregorian calendar, in en_US locale and default format length, a time label is formatted like that: “10:00 AM” or “8:15 AM”.
We can define a function to have a more compact display:
new Calendar({
  formatItemTimeFunc: function(d, rd){
    return rd.dateLocaleModule.format(d, {
      selector: 'time',
      timePattern: d.getMinutes() == 0 ? "ha":"h:mma"}
    ).toLowerCase();
  }
});
This will result into “10am” and “8:15am” when using the previous examples.
Common properties
This section describes properties and concepts that are common to the views classes.
Note: the views are first citizen widgets that can be use alone without enclosing them into a Calendar widget.
Renderer kind mapping
The itemToRendererKindFunc properties allow to specify a mapping between a store item and a kind of renderer (vertical, horizontal or label).
- Setting this function allows to:
- Filter out some events, based on some of their properties,
- Choose which kind of renderer is more suited to display the event.
- The default function behavior on the ColumnView is:
- If the event is not an all day event, use vertical renderer,
- otherwise, do not display the event.
The all day events are displayed on the secondary sheet which also have a function with the inverse behavior.
For example, to show all-day events and all the events whose duration is equal or greater than a usual day (1440 minutes) on the secondary sheet only:
new ColumnView({
  itemToRendererKindFunc: function(item){
    return item.allDay ||
      this.dateFuncObj.difference(item.startTime, item.endTime, "minute") > 1440 ? "null" : "vertical";
    },
  secondarySheetProps: {
    itemToRendererKindFunc: function(item){
      return item.allDay ||
        this.dateFuncObj.difference(item.startTime, item.endTime, "minute") > 1440 ? "horizontal" : null;
    }
  }
});
- The default function behavior on the MatrixView is:
- If the event duration is equal or greater than a usual day (1440 minutes), use a horizontal renderer,
- otherwise use a label renderer.
You can customize this behavior to show only horizontal renderers, for example:
new MatrixView({
  itemToRendererKindFunc: function(item){
    return "horizontal";
  }
}, null);
Renderer overlap
When two event renderers are overlapping in time, the renderer can either be displayed side by side (no overlap) or can overlap visually horizontally (vertical renderers) or vertically (horizontal renderers).
Note that the label renderers cannot overlap visually.
To specify the overlap, set the percentOverlap property. A 0 value means no overlap, 50 means an overlapping of the half of renderer size.
The following images show two overlapping events that are displayed by vertical renderer. The first one shows a percentOverlap of 70%, the second on a percentOverlap of 0%.

Layout priority
- During the layout process, the events that are in the displayed time range are sorted according to the follwing comparison function:
- Events that starts first are placed first
- If two events have the same start time, the longest is placed first.
These simple rules allow to have nice looking layout when events are overlapping.
If you want to change this event layout priority management, set a sorting function to the layoutPriorityFunction. One use case is to build a sort function based on a priority value set on the data store item itself.
Renderers
The renderer classes are not set by default on the views.
The calendar widget is setting the default renderers to the views. If a view is used alone, the renderer must be set explicitly.
Column View
Properties
The displayed time interval is defined by the startDate and columnCount properties. It is columnCount days from the startDate.
The time of day displayed is defined by the minHours (8 by default) and maxHours (18 by default) properties. For example to show the entire day set minHours to 0 and maxHours to 24.
The desired size of an hour is defined in the hourSize property (100 by default). According to the value of time slot duration, the size may be slightly bigger.
The time slot duration can defined defined by setting the timeSlotDuration property (15 by default). For example, to show only half hours set the timeSlotDuration to 30.
The scroll position can be retrieved or set using the startTimeOfDay property. The value is an objet containing the following properties:
- hours - The hours part of the time of day,
- minutes - the minutes part of the time of day,
- duration (setter) - the scroll animation duration to scroll from the minHours to the maxHours. The actual duration is computed according to the distance to scroll in order to scroll always at the same speed.
- easer (setter) - if duration is greater than 0, the easing function to use to animate the scroll.
For example to programmatically scroll the view to 9 am using an animation, use the following code:
columnView.set("startTimeOfDay", {hours:9, duration:1000});
The columns view is using a scroll bar, in right-to-left display, you can define the position of the scroll bar with respect to the sheet by setting the scrollBarRTLPosition property. Values are “left” (default) and “right”.
Layout
In addition to the properties defined in the common section, the column view also exposes the horizontalGap property (default is 4).
This value is used to specify the gap in pixels between each overlapping renderer if percentOverlap is 0.
Renderers
- The column view is using several renderers:
- vertical renderers to show the events in the main sheet.
- horizontal renderers and expand renderers for secondary sheet.
The vertical renderer class can be set on the verticalRenderer property.
The secondary sheet is a custom matrix view, see matrix view renderers for more information on the horizontal and expand renderers.
Styling
The styling of a column view is defined in the themes/claro/ColumnView.css and themes/claro/ColumnView_rtl.css. The base CSS pseudo class name is dojoxCalendarColumnView.
The styling of a simple column view is defined in the themes/claro/SimpleColumnView.css and themes/claro/SimpleColumnView_rtl.css. The base CSS pseudo class name is dojoxCalendarSimpleColumnView.
- Several functions are provided to style or set a style class on part of the view:
- styleColumnHeaderCell(node, date, renderData): allows to style a column header cell. By default, it installs dojoxCalendarToday and dojoxCalendarWeekend CSS pseudo classes.
- styleRowHeaderCell(node, hour, renderData): allows to style a row header cell. By default, does nothing.
- styleGridColumn(node, date, renderData): allows to style a grid column. By default, it installs dojoxCalendarToday and dojoxCalendarWeekend CSS pseudo classes.
Date formatting
- To change the default formatting of the a label, one can:
- set a custom date pattern in a dedicated property or
- override the function that formats the date.
The properties and function used by the column view are described in the following table:
| Label | Custom pattern property | Formatting function |
|---|---|---|
| row header cell | rowHeaderTimePattern | _formatRowHeaderLabel() |
| column header cell | columnHeaderDatePattern | _formatColumnHeaderLabel() |
Matrix View
Properties
The displayed time range is defined by the startDate, columnCount and rowCount properties. The time range is columnCount x rowCount days from the startDate.
The refStartTime and refEndTime can be used to define a time range of interest. This time range must be included in the displayed time range. It allows to show days out of the time range of interest by greying their cells.
Expanded row
The matrix view can have one row expanded to show mode events on this particular row (usually a week).
The following functions are available on the matrix view to manage this feature:
| Method | Description |
|---|---|
| expandRow() | Expands a row with an optional animation. |
| collapseRow() | Collapses a row with an optional animation. |
| getExpandedRowIndex() | Returns the expanded row index if any, -1 otherwise. |
Renderers
The matrix view is using several renderers:
- horizontal renderers (horizontalRenderer property) to display events that last at least a day,
- label renderers (labelRenderer property) to display the other events.
- expand renderer (expandRenderer property), which indicates visually that some events are visibles on a cell.
Horizontal renderers are placed and sized according to the start and end time of the event.
Label renderers a placed in a cell and takes the cell width. They cannot overlap and cannot be resized.
Layout
The matrix view has several layout properties.
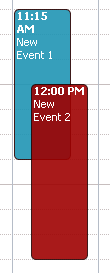
The roundToDay property (default true), indicates that horizontal renderers that represent events whose start or end time is not the start or end of a day should fill the cells that they are overlapping.
The two following images show the same event that starts at 8 am and finishes at the end of the next day. This first one shows the result when the roundToDay property is true and the next one is this property is false.
This property can also be set to false, if all the events are displayed using horizontal renderers (see itemToRendererKindFunc property).
The size of the renderers are defined by the following properties:
| Renderer | Property | Default value |
|---|---|---|
| horizontal | horizontalRendererHeight | 17 |
| label | labelRendererHeight | 14 |
| expand | expandRendererHeight | 15 |
In addition all the renderers shifted vertically of the value of the cellPaddingTop property (16 by default) to show the cell header.
Styling
The styling of a matrix view is defined in the themes/claro/MatrixView.css and themes/claro/MatrixView_rtl.css.
The base CSS pseudo class name is dojoxCalendarMatrixView.
- Several functions are provided to style or set a style class on part of the view:
- styleColumnHeaderCell(node, date, renderData): allows to style a column header cell. By default, it installs dojoxCalendarWeekend CSS pseudo classes.
- styleRowHeaderCell(node, hour, renderData): allows to style a row header cell. By default, does nothing.
- styleGridCell(node, date, renderData): allows to style a grid column. By default, it installs dojoxCalendarToday, dojoxCalendarWeekend and dojoxCalendarDisabled CSS pseudo classes.
Date formatting
- To change the default formatting of the a label, one can:
- set a custom date pattern or a custom format length in a dedicated property or
- override the view function that formats the date.
The properties and function used by the column view are described in the following table:
| Label | Formatting function | Property |
|---|---|---|
| row header cell | _formatRowHeaderLabel() | none |
| column header cell | _formatColumnHeaderLabel() | columnHeaderLabelLength |
| grid cell header | _formatGridCellLabel() | cellHeaderLongPattern (first visible day of month) and/or cellHeaderShortPattern (other days of month) |
Month Column View
Properties
The displayed time interval is defined by the startDate and columnCount properties. It is columnCount months from the first day of month defined by the startDate.
The desired size of a day is defined by the daySize property (30 by default).
The scroll position can be retrieved or set using the scrollPosition property. The value is an objet containing the following properties:
- date - The scroll position in day,
- duration (setter) - the scroll animation duration to scroll from the minHours to the maxHours. The actual duration is computed according to the distance to scroll in order to scroll always at the same speed.
- easer (setter) - if duration is greater than 0, the easing function to use to animate the scroll.
For example to programmatically scroll the view to the 10th using an animation, use the following code:
monthColumnView.set("scrollPosition", {position:10, duration:1000});
The month columns view is using a scroll bar, in right-to-left display, you can define the position of the scroll bar with respect to the sheet by setting the scrollBarRTLPosition property. Values are “left” (default) and “right”.
Layout
In addition to the properties defined in the common section, the month column view also exposes the horizontalGap property (default is 4).
This value is used to specify the gap in pixels between each overlapping renderer if percentOverlap is 0.
The hidden items grid cell decoration can be not displayed by setting the showHiddenEvents property.
Renderers
The month columns view is only using vertical renderers.
The vertical renderer class can be set on the verticalRenderer property.
Styling
The styling of a month columns view is defined in the themes/claro/MonthColumnView.css and themes/claro/MonthColumnView_rtl.css. The base CSS pseudo class name is dojoxCalendarMonthColumnView.
- Several functions are provided to style or set a style class on part of the view:
- styleColumnHeaderCell(node, date, renderData): allows to style a column header cell.
- styleGridCell(node, date, renderData): allows to style a grid cell. By default, it installs dojoxCalendarToday and dojoxCalendarWeekend CSS pseudo classes.
In an additional layout pass, the dojoxCalendarHiddenEvents CSS pseudo class is installed on grid cells if they are hidden days in the corresponding date.
Date formatting
- To change the default formatting of the a label, one can:
- set a custom date pattern in a dedicated property or
- override the function that formats the date.
The properties and function used by the column view are described in the following table:
| Label | Custom pattern property | Formatting function |
|---|---|---|
| column header cell | columnHeaderDatePattern | _formatColumnHeaderLabel() |
| grid cell | gridCellPattern | _formatGridCellLabel() |
Custom renderers
Several default renderers are provided but you can develop your own renderer.
The renderer must extend the dojox.calendar._RendererMixin class.
The main property is of course the item property. The item is an object that contains:
- item - the store item.
- range - the part of the event displayed by this renderer. Sometimes several renderers are needed to display one event,
- other layout properties.
The owner property contains a reference to the view that is using this renderer.
This class provides the state management of the displayed event. The values are computed by the view and passed to the renderer.
The state properties are: edited, focused, hovered, selected. If a state is set, a custom CSS pseudo class is added (same name with upper case first letter for example “Selected”).
Finally the moveEnabled and resizeEnabled properties, define if the renderer can be respectively moved or resized.
If the renderer needs a substantial refresh, the updateRendering() function is called. It is used mainly to compute the visibility of sub-components of the renderer.
Other utility functions are provided to format time and set text using Bidi text direction etc.
Event editing
Introduction
The calendar allows to interactively move or resize an event
Steps
- The event editing process is going through the following steps:
- The editing is initialized by a user interaction, the widget is entering in edit mode.
- The user is doing some move gestures or/and some resize gestures.
- The user validate or cancel the changes, the widget is leaving edit mode.
- There are some specifics depending on the device used:
- Using the mouse: only one gesture (move or resize) per editing.
- Using touch events: cancellation is not possible (possible future improvement).
Editing flags
The editable property allows to globally enable or disable the editing capability of the widget.
If the editable property is true, the moveEnabled and resizeEnabled properties allow to control respectively if an event can be moved or resized.
To have a control of move or resize at the event level, override respectively the isItemMoveEnabled() or isItemResizeEnabled() functions.
Editing behavior properties
To customize the event editing behavior, a set of properties are exposed by the views.
| Property | Column view default value | Matrix view default value | Month Columns default value | ViewDescription |
|---|---|---|---|---|
| allDayKeyboardLeftRightSteps | 1 | 1 | 1 | How many unit to add or removed when using the keyboard left or right keys when editing an all day event. |
| allDayKeyboardLeftRightUnit | “day” | “day” | “month” | Unit to add or remove when using the keyboard left or right keys when editing an all day event. |
| allDayKeyboardUpDownSteps | 0 | 7 | 1 | How many unit to add or remove when using the keyboard up tor bottom keys when editing an all day event. |
| allDayKeyboardUpDownUnit | “day” | “day” | “day” | Unit to add or remove when using the keyboard up tor down keys when editing an all day event. |
| allowResizeLessThan24H | true | false | false | Allow or not to resize an event that is lasting more than 24 hours to a duration less than 24 hours. Matrix view is preventing this because by default two renderer kinds are used to display events depending on their duration. |
| allowStartEndSwap | true | true | true | Allows move the end of an event before the start and vice versa. |
| keyboardLeftRightSteps | 1 | 15 | 1 | How many unit to add or remove when using the keyboard left or right keys. |
| keyboardLeftRightUnit | “day” | “minute” | “month” | Unit to add or remove when using the keyboard left tor right keys.. |
| keyboardUpDownSteps | 15 | 7 | 1 | How many unit to add or remove when using the keyboard up or down keys. |
| keyboardUpDownUnit | “minutes” | “day” | “day” | Unit to add or remove when using the keyboard up or down keys.. |
| liveLayout | false | false | false | If false, only the edited renderer position/size is updated during the editing gestures. Otherwise all the renderers are updates during the editing gesture (more CPU intensive). |
| minDurationSteps | 15 | 15 | 1 | The number of unit used to define the minimum duration of an event. |
| minDurationUnit | “minute” | “minute” | “day” | The unit used to define the minimum duration of an event. |
| snapSteps | 15 | 15 | 1 | The number of unit used to compute the snapping of edited dates. |
| snapUnit | “minutes” | “minute” | “day” | The used to compute the snapping of edited dates. |
| stayInView | true | true | true | Forces the event to stay in the view. |
| touchEndEditingTimer | 5000 | 5000 | 5000 | The time out after a implicit validation of changes in touch environment. |
| touchStartEditingTimer | 750 | 750 | 750 | The amount of time needed a renderer needs to be pressed before entering in edit mode. |
| triggerExtent | 3 | 3 | 3 | The distance in pixels needed to trigger the editing using the mouse. |
For example to change the minimal duration of an event to 30 minutes.
calendar.columnView.set("minDurationSteps", 30);
calendar.columnView.set("minDurationUnit", "minute");
Editing handlers
In some advanced use cases, the editing properties are not sufficient, the editing events are used to have a specific behavior.
One example is preventing moving an event in the 11:30am - 2:00pm interval.
These events are listed in the following table:
| Event | Description | Usage |
|---|---|---|
| itemEditBegin | The widget has entered in edit mode | Store initial values. |
| itemEditBeginGesture | A gesture is beginning | Store initial values before gesture. |
| itemEditMoveGesture | A move gesture occurred | Snapping, view limit management. |
| itemEditResizeGesture | A resize gesture occurred | Snapping, view limit management, duration constraints enforcement. |
| itemEditEndGesture | A move or resize gesture has ended | Apply or cancel gesture. |
| itemEditEnd | The event editing has ended | Apply changes to store item or cancel changes and revert start and end time. |
All the editing events have an item property which is an object that contains the start and end time during the event editing in the startTime and endTime properties.
When the item is moved or resized, new start and end time values are computed and put these properties.
The itemEditMoveGesture and itemEditResizeGesture default event handlers are then manipulating these properties to apply snapping, limits etc according to the editing properties values.
Table of Contents
- dojox.calendar
- Introduction
- Creating a Calendar
- Configuring Calendar data
- Time range definition
- Styling renderers
- Views
- Interactions
- Calendar events
- Advanced configuration