This tutorial is for Dojo 1.6 and may be out of date.
Up to date tutorials are available.
Creating a custom widget
In this recipe, we'll be covering how to leverage pieces of Dojo and the Dijit framework to create your own custom widgets, specifically covering use of dijit._Widget and dijit._Templated to quickly and easily set up your widget.
Introduction
The Dojo Toolkit ships with the Dijit framework, which is a rather powerful and comprehensive set of widgets, and using these widgets, we can put together some really rich interfaces. From advanced form elements to layout and display Dijits, there's really a plethora of options and choices when putting together your application.
However, there are those times where there's not a Dijit that suits your needs — you really need something custom. Perhaps you have a complex piece of information that you wish to display. You could take the time to build out DOM by hand while iterating over this data, but if your data is even slightly complex, that's not the most efficient way. Fortunately, Dijit's core building blocks are available to us, which makes it simple to get started with our own custom widgets.
Setup
For our scenario, let's say that we have a data source somewhere, in JSON format, listing a series of authors, such as those who've penned a tutorial for Dojo. We happen to have that, and it looks something like this:
[
	{
		"name": "Brian Arnold",
		"avatar": "/includes/authors/brian_arnold/avatar.jpg",
		"bio": "Brian Arnold is a software engineer at SitePen, Inc., ..."
	},
	/* More authors here... */
]
We also know that we want our end result to live in a page, somewhere like this:
<body>
	<!-- Headers and whatnot -->
	<h2>Authors</h2>
	<div id="authorContainer">
		<!-- Authors go here! -->
	</div>
</body>
We'll also say that we want it to be a little fancy—perhaps we get a background color to fade in as we mouse over it. Eventually, we want it to look something like this:

Solution
We can create our own widget by following a simple series of steps.
- Create some file structure for our custom widget
- Create markup that will represent an individual author
- Augment our author markup to make it a Dijit template
- Create our widget class using
dojo.declare - Style as appropriate
Step 1: Create a file structure for our custom widget
While this step is arguably optional, it's generally considered a good practice to have a proper file structure for your custom Dijit work (or custom code in general). In this case, I'm going to create a folder named 'custom', which will represent my namespace. This name is completely up to you, and I would suggest using something meaningful, like the name of your organization, or the application that this widget will be a part of. I'm going to call it AuthorWidget (as I'm so original), so I'm going to create a folder in my space with that same name, to store things like any relevant CSS or HTML templates. My eventual structure looks something like this:
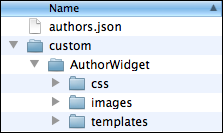
We haven't actually created any files yet in our custom space - just some hierarchy.
Step 2: Create markup that will represent an individual author
Now that we have some structure to store our pieces, let's create some simple markup that represents an individual author. For your first widget, it's likely going to be simplest to just set up a basic page where you directly put in some sample values.
When you're working out a template, you should always create one parent wrapping element that contains all of the other elements. This element can be whatever you want, but it's important to have just one root element. For our data, we'll use a div as our wrapping element. We'll put in our author's name using an H3 element, the image using an img element, and then our bio inside of a p element.
<div>
	<h3>Brian Arnold</h3>
	<img src="/includes/authors/brian_arnold/avatar.jpg">
	<p>Brian Arnold is a software engineer at SitePen, Inc., ...</p>
</div>
Step 3: Augment our author markup to make it a Dijit template
When using dijit._Templated, you can adjust your markup in a variety of ways:
- You can have values from your widget automatically inserted
- You can designate elements in your template as Attach Points, giving you a programmatic reference to that node in the widget
- You can set up methods to be called on DOM events related to specific nodes
For our purposes, we're not worried about events right now — but we definitely want to take advantage of some of the automatic insertion. We're going to create a file in our hierarchy, under custom/AuthorWidget/templates/ named AuthorWidget.html. It's basically the markup defined above, but with some simple additions.
<div>
	<h3 data-dojo-attach-point="nameNode">${name}</h3>
	<img class="${baseClass}Avatar" src="" data-dojo-attach-point="avatarNode">
	<p data-dojo-attach-point="bioNode">${!bio}</p>
</div>
There are a few things to note as to what's going on here:
- We can use a
${attribute}syntax to directly insert some values, like our name. - We can use a
${!attribute}syntax to directly insert some values from our widget as well, like we're doing with bio. The major distinction between${attribute}and${!attribute}in this case is that our bio contains HTML, and I want to avoid havingdijit._Templatedperform automatic escaping on the inserted content. - All
dijit._Widget-based widgets have abaseClassproperty by default, and by leaning on that, we can provide a custom class to our avatar. - I've given all nodes an attach point, meaning that in my widget code, I can use that name to reference that node directly. Think of it kind of like doing some
dojo.byIdtype work without needing IDs, where I set up references in advance — so with an instance of my AuthorWidget, I could usemyAuthor.nameNodeto directly reference the H3 DOM node for that widget.
You might have noticed that I haven't set the avatar's source directly. What happens if we have an author that doesn't have an avatar specified? I don't want to show a broken image. We'll handle the default value for that when we create our widget, which we'll do now!
Step 4: Create our widget class using dojo.declare
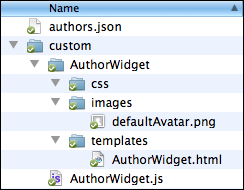
At this point, in our file structure above, we're going to create a file named AuthorWidget.js directly in the custom folder. We'll also add a default avatar image. Our file structure is starting to fill out a little! After this step, it'll be much more filled out. We'll be doing the bulk of our work at this point.
Now, we can simply build our widget! The following code would go in your AuthorWidget.js file.
// custom.AuthorWidget
dojo.provide("custom.AuthorWidget");

// Bring in what we need
dojo.require("dijit._Widget");
dojo.require("dijit._Templated");

// Create our widget!
dojo.declare("custom.AuthorWidget", [dijit._Widget, dijit._Templated], {
	/* Our properties will be filled out here in this object */
}); // and that's it!
The key things to note here:
- We use
dojo.provideto indicate that we are going to be providing the resource as identified by 'custom.AuthorWidget'. Dojo 1.6 does support the use of AMD modules now, but for simplicity's sake, we're using this approach for now, which works well for prior versions of Dojo 1.x as well. - We
dojo.requirein the modules that we need as a base for our widget. - We then use
dojo.declareto set up our custom AuthorWidget, using dijit._Widget and dijit._Templated as a base.
Note that we didn't have to use dojo.ready in here - when working in modules, Dojo will intelligently handle this situation, ensuring that all required modules are ready for you before moving on.
Now, if we stopped here, this wouldn't work. We do need to set some properties up, so that the widget is aware of what sorts of properties it'll receive. Here's the setup for our dojo.declare call, now with properties.
dojo.declare("custom.AuthorWidget", [dijit._Widget, dijit._Templated], {
	// Some default values for our author
	// These typically map to whatever you're handing into the constructor
	name: "No Name",
	// Using dojo.moduleUrl, we can get a path to our AuthorWidget's space
	// and we want to have a default avatar, just in case
	avatar: dojo.moduleUrl("custom.AuthorWidget", "images/defaultAvatar.png"),
	bio: "",

	// Our template - important!
	templateString:
		dojo.cache("custom.AuthorWidget", "templates/AuthorWidget.html"),

	// A class to be applied to the root node in our template
	baseClass: "authorWidget",

	// A reference to our background animation
	mouseAnim: null,

	// Colors for our background animation
	baseBackgroundColor: "#fff",
	mouseBackgroundColor: "#def"
});
We have several things going on here, so let's break it down.
- We start off with some properties relevant to our author -
name,bio,avatar- setting default values. By usingdojo.moduleUrl, we can get a path to where our AuthorWidget is located, and tap into the images folder under there. - Using the
templateStringproperty anddojo.cache, we specify our template's contents. - We set our
baseClass. This will be applied to our root node, which in our case is thedivin our template. - We set up a reference for our animation, to be worked with in a moment, as well as a couple of colors for the animation.
This is all well and good, and if we stopped here, it'd actually work as a very basic widget that displayed information. However, we can add in a couple of methods to make things a bit safer. We're going to be adding a postCreate, a custom property setter for the avatar property, and a utility function to make it easy to change background color. Let's visit each one of those.
The postCreate method is where we want to put the bulk of our work. It's called once our widget's DOM structure is ready, but before it's been inserted into the page. It's typically the best place to put any sort of initialization code.
postCreate: function(){
	// Get a DOM node reference for the root of our widget
	var domNode = this.domNode;

	// Run any parent postCreate processes - can be done at any point
	this.inherited(arguments);

	// Set our DOM node's background color to white -
	// smoothes out the mouseenter/leave event animations
	dojo.style(domNode, "backgroundColor", this.baseBackgroundColor);
	// Set up our mouseenter/leave events - using dijit._Widget's connect
	// means that our callback will execute with `this` set to our widget
	this.connect(domNode, "onmouseenter", function(e) {
		this._changeBackground(this.mouseBackgroundColor);
	});
	this.connect(domNode, "onmouseleave", function(e) {
		this._changeBackground(this.baseBackgroundColor);
	});
}
Here, we're setting some style based on our baseBackgroundColor property, and then setting up some onmouseenter/onmouseleave events, so that as people mouse over the DOM node, our custom _changeBackground function is called. Let's take a look at that:
_changeBackground: function(toCol) {
	// If we have an animation, stop it
	if (this.mouseAnim) { this.mouseAnim.stop(); }

	// Set up the new animation
	this.mouseAnim = dojo.animateProperty({
		node: this.domNode,
		properties: {
			backgroundColor: toCol
		},
		onEnd: dojo.hitch(this, function() {
			// Clean up our mouseAnim property
			this.mouseAnim = null;
		})
	}).play();
}
Why is this method called _changeBackground and not just changeBackground? I've named it with a leading underscore to indicate that users of this widget should treat the method as though it were private, and not something to be used directly.
It's a common Dojo pattern to prefix methods or objects with an underscore in order to indicate that they shouldn't be used directly. It doesn't actively stop users from using those methods, but is a useful implicit indication of sorts that "Hey, this isn't meant for general use".
We're checking our mouseAnim property to see if there's an animation there, and if we have something there, we're calling stop to stop it, as a means of being safe. Then, we simply set up the new animation and save it back into mouseAnim, then start it playing. This example is very similar to an effect as demonstrated in the Animation tutorial, though with some different colors.
Finally, remember how we had concerns earlier that a user might not have an avatar, and we set up a default one? We can set up a custom setter function for attributes, which will automatically be called any time that value is set, either when the widget is being created or if someone calls myWidget.set("avatar", somePath). The name of the method is special, and maps to the name of the property—in this case, for avatar, our name will be _setAvatarAttr.
_setAvatarAttr: function(av) {
	// We only want to set it if it's a non-empty string
	if (av != "") {
		// Save it on our widget instance - note that
		// we're using _set, to support anyone using
		// our widget's Watch functionality, to watch values change
		this._set("avatar", av);

		// Using our avatarNode attach point, set its src value
		this.avatarNode.src = av;
	}
}
Starting with Dojo 1.6, all dijit._Widget widgets base off of dojo.Stateful in their inheritance chain, which means that users can actively watch for value changes. We use _set within our setter to ensure that all watch calls are properly fired, and then we use our avatarNode attach point to set the image's src attribute to the value being set. By wrapping it in a check for the string not being empty, we're trying to avoid cases where the avatar property may be there, but with nothing but an empty string. This way, we get our default image if we have no value, with a bit of a safety check.
With all of these items in place, we have a working widget! However, as you can see, it's not exactly pretty yet.
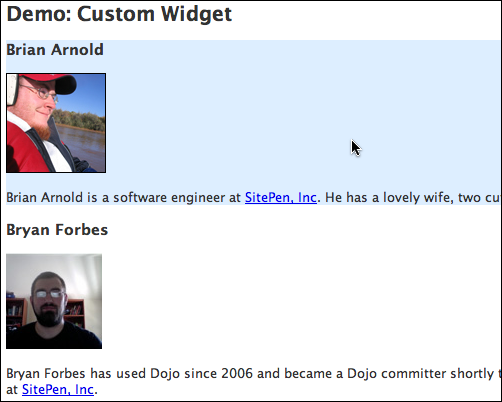
View Demo
Step 5: Style as appropriate
One of the benefits of using dijit._Widget, as mentioned above, is that it gives us a baseClass that we can work off of for styling purposes. Using that, we can create some fairly simple styling. We have a folder under our AuthorWidget space just for css, so let's create an AuthorWidget.css file in there.
/* AuthorWidget.css */
.authorWidget {
	border: 1px solid black;
	width: 400px;
	padding: 10px;
	overflow: hidden; /* I hear this helps clear floats inside */
}

.authorWidget h3 {
	font-size: 1.5em;
	font-style: italic;
	text-align: center;
	margin: 0px;
}

.authorWidgetAvatar {
	float: left;
	margin: 4px 12px 6px 0px;
	max-width: 75px;
	max-height: 75px;
}
Since I know our baseClass is authorWidget, we can work off of that. Also, if you recall, in the template, we set a class on the avatar of ${baseClass}Avatar, so we can use authorWidgetAvatar in our styling. This is just some basic styles: I'm an engineer, not a designer!
Now, with that in place, we just need to add the CSS to our head on our page, and we have (arguably) a nicer looking author list!
View Demo
Summary
As you can see, using dijit._Widget and dijit._Templated makes it fairly easy to pull together a custom widget. We were able to quickly set up a template, and with a little bit of work, we were able to create our AuthorWidget class based off of dijit._Widget and dijit._Templated.
It's worth noting that most widgets in Dijit itself are built using these same tools, and we've only scratched the surface of what they can do. Be sure to follow through some of the links before for more information!
Colophon
- dijit._Widget on the Dojo Reference Guide
- dijit._Templated on the Dojo Reference Guide
- Tutorial on dojo.declare
- Dojo Reference Guide: Writing Your Own Widget