dijit.layout
| Authors: | Bill Keese, Nikolai Onken |
|---|---|
| Developers: | ?- |
| Available: | since V? |
Contents
An example first
Before we dive into the depths of making layouts with the Dojo Toolkit lets look at an example. Once you have read through this page you should be able to create such an layout yourself and even start experimenting with the Dijit layout components
<script type="text/javascript">
dojo.require("dijit.layout.BorderContainer");
dojo.require("dijit.layout.TabContainer");
dojo.require("dijit.layout.AccordionContainer");
dojo.require("dijit.layout.ContentPane");
</script>
<div dojoType="dijit.layout.BorderContainer" style="width: 100%; height: 100%;">
     <div dojoType="dijit.layout.ContentPane" region="top">Top pane</div>
     <div dojoType="dijit.layout.AccordionContainer" region="leading">
          <div dojoType="dijit.layout.AccordionPane" title="pane #1">accordion pane #1</div>
          <div dojoType="dijit.layout.AccordionPane" title="pane #2">accordion pane #2</div>
          <div dojoType="dijit.layout.AccordionPane" title="pane #3">accordion pane #3</div>
     </div>
     <div dojoType="dijit.layout.TabContainer" region="center">
          <div dojoType="dijit.layout.ContentPane" title="tab #1">tab pane #1</div>
          <div dojoType="dijit.layout.ContentPane" title="tab #2">tab pane #2</div>
          <div dojoType="dijit.layout.ContentPane" title="tab #3">tab pane #3</div>
     </div>
     <div dojoType="dijit.layout.ContentPane" region="trailing">Trailing pane</div>
     <div dojoType="dijit.layout.ContentPane" region="bottom">Bottom pane</div>
</div>
<style type="text/css">
  html, body {
    width: 100%;
    height: 100%;
    margin: 0;
  }
</style>
HTML and Layouts
Typically HTML has bottom-up sizing, where a container is as big as it’s contents, so that given
<style type="text/css">
   .inner, .outer { margin: 5px; border: 1px solid blue; }
   .inner { border: 1px solid green; }
</style>
<div class="outer">
  <div  class="inner">
    Part 1
  </div>
  <div class="inner">
    Part 2
  </div>
</div>
The two inner (green) divs are each large enough to hold their text (“Part 1” and “Part 2”), and the outer is in turn big enough to hold the two inner divs. And if outer is bigger than the browser’s viewport, the browser window displays a scrollbar. The web page you’re reading now uses that layout, and unless your monitor is 3 feet tall (in which case, we envy you!) you see the scrollbar on the right.
But for some web pages, you want them to work with the opposite pattern, where you start with a given size, typically the browser viewport, and then partition it into smaller sections. This is the way desktop application look, for example a mail program that has a tree on the left, a list of messages in the upper right, and the message preview on the lower right.
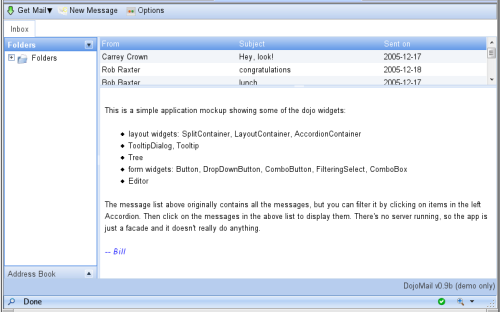
Note that in this scenario, there’s no scrollbar on the browser window itself, but if any pane is too small to display all the text it contains then it gets a scroll bar.
Layout like above can be done using tables or fancy CSS (see recent A List Apart article about CSS sizing):
<style type="css/text">
  .top, .bottom { height: 100px; }
  .center { height: 200px; width: 300px; }
  .leading, .trailing { width: 200px; }
</style>
<table>
  <tr>
     <td colspan=3><div class=top>Top Pane</div></td>
  </tr>
  <tr>
     <td><div class=leading>Leading pane</div></td>
     <td><div class=center>Center pane</div></td>
     <td><div class=trailing>Trailing pane</div></td>
  </tr>
  <tr>
     <td colspan=3><div class=bottom>Bottom pane</div></td>
  </tr>
</table>
However, that technique has it’s limits... it doesn’t allow things like tabs or accordions or split containers where the user can adjust the size of each pane.
Dijit Layout
Dijit has a number of layout widgets which can be combined in a hierarchy to achieve that. Every layout widget contains a list of other layout widgets, except for the “leaf” nodes in the hierarchy, which are typically ContentPanes.
You typically start off the page using a BorderContainer, like this, to split the screen into sections:
<script type="text/javascript">
dojo.require("dijit.layout.BorderContainer");
dojo.require("dijit.layout.ContentPane");
</script>
<div dojoType="dijit.layout.BorderContainer" style="width: 100%; height: 100%">
     <div dojoType="dijit.layout.ContentPane" region="top">Top pane</div>
     <div dojoType="dijit.layout.ContentPane" region="leading">Leading pane</div>
     <div dojoType="dijit.layout.ContentPane" region="center">Center pane</div>
     <div dojoType="dijit.layout.ContentPane" region="trailing">Trailing pane</div>
     <div dojoType="dijit.layout.ContentPane" region="bottom">Bottom pane</div>
</div>
<style type="text/css">
  html, body {
    width: 100%;
    height: 100%;
    margin: 0;
  }
</style>
Then you start nesting containers. For instance, on the left you might want an AccordionContainer:
<script type="text/javascript">
dojo.require("dijit.layout.AccordionContainer");
</script>
<div dojoType="dijit.layout.AccordionContainer" style="width: 200px; height: 95%; margin: 0 auto;">
     <div dojoType="dijit.layout.AccordionPane" title="pane #1">accordion pane #1</div>
     <div dojoType="dijit.layout.AccordionPane" title="pane #2">accordion pane #2</div>
     <div dojoType="dijit.layout.AccordionPane" title="pane #3">accordion pane #3</div>
</div>
<style type="text/css">
  html, body {
    width: 100%;
    height: 100%;
  }
</style>
And a TabContainer in the middle:
<script type="text/javascript">
dojo.require("dijit.layout.TabContainer");
dojo.require("dijit.layout.ContentPane");
</script>
<div dojoType="dijit.layout.TabContainer" style="width: 100%; height: 100%; margin: 20px;">
     <div dojoType="dijit.layout.ContentPane" title="tab #1">tab pane #1</div>
     <div dojoType="dijit.layout.ContentPane" title="tab #2">tab pane #2</div>
     <div dojoType="dijit.layout.ContentPane" title="tab #3">tab pane #3</div>
</div>
<style type="text/css">
  html, body {
    width: 100%;
    height: 100%;
  }
</style>
Nesting those inside of the BorderContainer will look like this:
<script type="text/javascript">
dojo.require("dijit.layout.BorderContainer");
dojo.require("dijit.layout.TabContainer");
dojo.require("dijit.layout.AccordionContainer");
dojo.require("dijit.layout.ContentPane");
</script>
<div dojoType="dijit.layout.BorderContainer" style="width: 100%; height: 100%;">
     <div dojoType="dijit.layout.ContentPane" region="top">Top pane</div>
     <div dojoType="dijit.layout.AccordionContainer" region="leading">
          <div dojoType="dijit.layout.AccordionPane" title="pane #1">accordion pane #1</div>
          <div dojoType="dijit.layout.AccordionPane" title="pane #2">accordion pane #2</div>
          <div dojoType="dijit.layout.AccordionPane" title="pane #3">accordion pane #3</div>
     </div>
     <div dojoType="dijit.layout.TabContainer" region="center">
          <div dojoType="dijit.layout.ContentPane" title="tab #1">tab pane #1</div>
          <div dojoType="dijit.layout.ContentPane" title="tab #2">tab pane #2</div>
          <div dojoType="dijit.layout.ContentPane" title="tab #3">tab pane #3</div>
     </div>
     <div dojoType="dijit.layout.ContentPane" region="trailing">Trailing pane</div>
     <div dojoType="dijit.layout.ContentPane" region="bottom">Bottom pane</div>
</div>
<style type="text/css">
  html, body {
    width: 100%;
    height: 100%;
    margin: 0;
  }
</style>
There are three types of elements in that example:
- BorderContainer: displays all it’s children at once in top/bottom/left/right/center positions
- StackContainers: containers that display one child at a time
- Leafs: leaf nodes containing content
The StackContainers in dijit are the AccordionContainer, TabContainer, or StackContainer itself. They all do basically the same thing, but look different.
The leafs are typically ContentPanes but could be any widget, such as dojox.grid.Grid or dijit.Toolbar. An important consideration is whether or not the widget’s size is adjustable (like a ContentPane) or not (like a Toolbar).
Conceptually it looks like this:

Sizing to Viewport
Sizing to browser viewport: To make the outermost layout widget size to the browser’s viewport, in your page CSS you should have:
1 2 3 4 | html, body, #mainDiv {
width: 100%; height: 100%;
border: 0; padding: 0; margin: 0;
}
|
where mainDiv is the id of the outermost div.
Note that height=width=100% means different things depending on the browser when you have padding or border, so when using those tags it's best not to have either of those. Put your padding, border, and margin on elements inside the outer layout container.
Visibility
Restrictions about visibility: none of the layout widgets work if they are inside a hidden element. This is very important and a mistake many people make. Dialog, etc. are created using visibility:hidden rather than display:none to avoid this problem.
Programmatic Creation and Lifecycle
This section discusses programmatic creation, destruction, etc.
Creation
When creating widgets programmatically, you create the parent first, then add the children, and grandchildren... and finally call startup(). Startup() is called once on the top element in the hierarchy, after the whole hierarchy has been setup and the element inserted.
1 2 3 4 5 6 7 8 9 10 11 12 13 14 15 16 17 18 19 20 21 22 23 | // create a BorderContainer as the top widget in the hierarchy
var bc = new dijit.layout.BorderContainer({style: "height: 500px; width: 800px;"});
// create a ContentPane as the left pane in the BorderContainer
var cp1 = new dijit.layout.ContentPane({
region: "left",
style: "height: 100px",
content: "hello world"
});
bc.addChild(cp1);
// create a TabContainer as the center pane in the BorderContainer,
// which itself contains two children
var tc = new dijit.layout.TabContainer({region: "center"});
var tab1 = new dijit.layout.ContentPane({title: "tab 1"}),
tab2 = new dijit.layout.ContentPane({title: "tab 2"});
tc.addChild( tab1 );
tc.addChild( tab2 );
bc.addChild(tc);
// put the top level widget into the document, and then call startup()
document.body.appendChild(bc.domNode);
bc.startup();
|
Note that:
- startup() is called once on the top most widget only
- (when possible) call startup last, after children have been added
- before startup() is called the top widget's node (BorderContainer in this example) must be attached to the document somewhere, so that node can size itself correctly
- top node in the hierarchy (BorderContainer in this example) has a specified size; other nodes typically don't have a size (except for nodes on the edges of BorderContainer) because their size is determined by the parent.
Add Children
After startup() has been called you can freely add children, like for example:
1 2 | // add a right pane to the BorderContainer
bc.addChild(new ContentPane({region: "right", content: "...", style: "width: 100px;"}));
|
or:
1 2 | // add a tab to the TabContainer
tc.addChild( new dijit.layout.ContentPane({title: "tab 3"});
|
Note that:
- you don't need to call startup() on the new children; it's called automatically when you add them to a hierarchy which has already been started.
Remove Children
Removing children is done w/the pointer to the child widget:
1 2 3 | // remove the first tab, and destroy it (and it's contents)
tc.removeChild(tab1);
tab1.destroyRecursive();
|
Note that:
- removeChild() doesn't destroy the widget, it just detaches it.
Destruction
Typically you destroy a widget and all it's descendants, like this:
1 | bc.destroyRecursive();
|
Resizing
The resize function for widgets layout widgets serves two purposes:
- set the size of the widget
- make the widget adjust the size of it's children
- children resize recursively
Usually you pass a size to the resize method, like:
1 | bc.resize({h: 500, w: 500});
|
If you want to notify a widget that it's size has been changed, you omit that argument:
1 | bc.resize();
|
Writing Layout Widgets
See the dijit.layout.LayoutWidget section for details on how to write a layout widget.